0 Things to Know Before You Start
0.1 Getting ready to use OpenCV
As you look at resources online for OpenCV, or even printed textbooks, they often begin with detailed and complicated instructions for installing OpenCV. Beware of blindly following these instructions! Installation of OpenCV has changed dramatically in just a few years, and often instructions online are out of date. Instead, look for the resources and instructions provided by your instructor, as they will be more suitable.
The key things you will need are:
- A current installation of Python
- A Python programming environment (PyCharm is recommended)
- The FFMPEG utility installed
- Numpy and OpenCV modules installed
Get help from the instructor or preceptor on the best way to install each of these, or for help if you run into any difficulties.
0.2 Background on OpenCV
OpenCV is one of the most widely-used computer vision libraries. It was originally created by Intel as a project to show off the abilities of their processor chips, and was released in 1999 (see OpenCV, on Wikipedia for more details). OpenCV has always been an open-source project, which means that its source code is available to read, download, and modify, and it is updated and maintained by a community of ordinary people. Currently, OpenCV has both C++ and Python versions: we will use the Python one as it is much easier to learn.
OpenCV implements hundreds of computer vision and image processing tools. We will explore a small percentage of what it offers. It integrates well with other libraries, including machine learning libraries.
OpenCV has thorough documentation for all of its tools (outstanding quality compared to some other open-source projects). The documentation is not easy to read, but it is worth working at it, because you can learn how the tools work, how to use additional options, and even learning new tools that we won’t cover in class. I recommend that you use the following approach to the documentation:
- Go to the main documentation page
- Use the search tool and type the name of the function you want, or a description of it
- Click on the suggested options until you find the one you want
- Read through the description of how the function works: Be sure to look for the description of how it is called in Python (different from C++)
0.2.1 Example: imshow documentation
Figure 1 shows the entry for the imshow function (we went to the main page, typed imshow into the search box, and chose the first option).
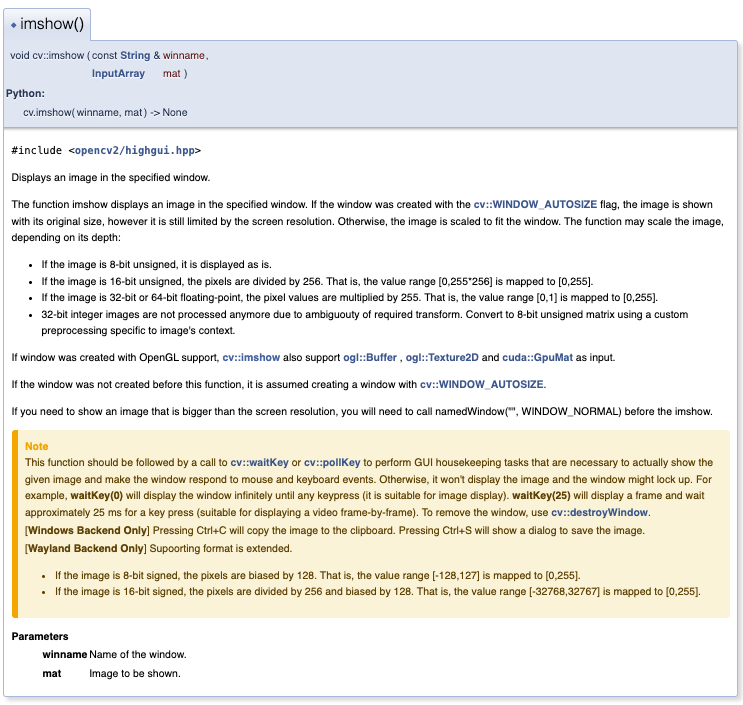
imshow function, with 3 key elements highlighted.
Three parts of a typical documentation entry are marked:
- This number marks the location of the python call interface. This describes the inputs to a call to
imshow, and what values it returns. Here, we see thatimshowtakes in two inputs, called winname and mat, and it returns nothing. Both are required inputs: you have to pass two values of the right type to this function every time you call it! - This number marks the description of what this function does. It probably has more details than you need (including what happens if you don’t pass it a typical image array), but the start of the description usually summarizes the main purpose, only read further if you need/want to
- This number explains what each input parameter means. Here, it tells us that
winnameis the name of the window (we might guess that this should be a string), and thatmatis the image to be shown. The variable namemathere is short for “matrix” and typically is used to indicate an image array or matrix of some kind.
This function also includes a note that is important for using it correctly. While it has more technical detail than you might want, the key point is important: you must follow a call to imshow with a call to the waitKey function, because waitKey actually causes the window to be displayed.
0.2.2 Example: imread documentation
Figure 2 shows the start of the entry for the imread function. Examine the call interfaces shown for this function. We usually use the first form, so let us look more closely at it. Inside the parentheses, you see two variables, filename and flags, and you can see that there is a return value, called retval. The first variable, filename, is just inside the call parentheses: this indicates that filename is a required input. This is a string which contains the path and filename needed to find the file on the computer (see the next section for more details).
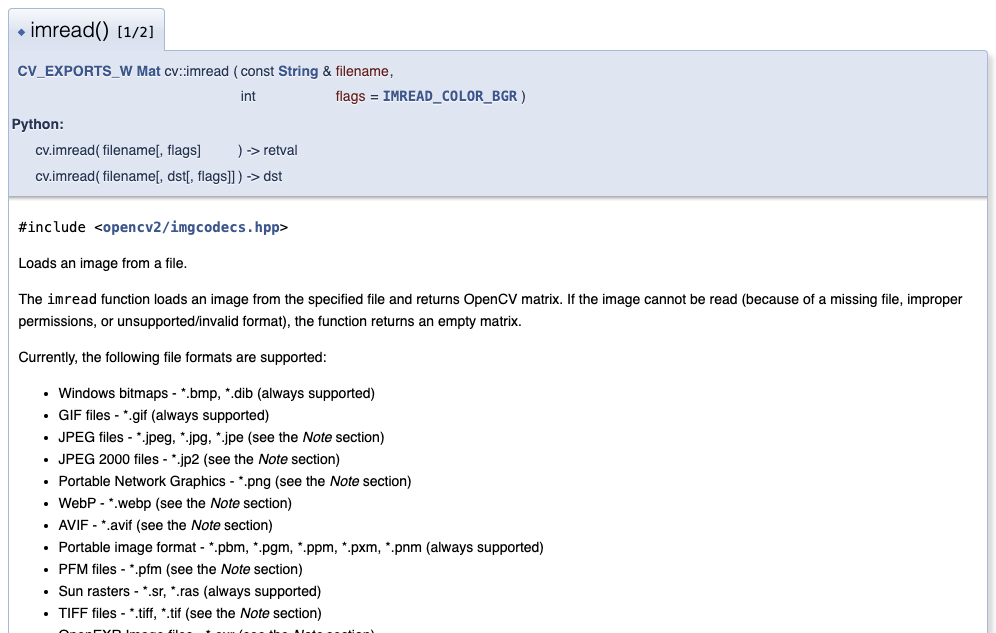
imread function, showing how optional inputs to functions are denoted
The second variable is inside square brackets. In the documentation, this indicates an optional input. Here, we can use the flags to read the data from the image file in different formats (BGR is the default, but we can also read in grayscale, or a format that preserves any alpha channel if the file has one).
The return value is named vaguely: retval is just short for return value. This is because the return value can be two different things. If you read through the description carefully, it tells you that retval is either the “matrix” (Numpy array) containing the image data, if the read was successful, and if the read failed, retval will be the special Python value, None.
0.3 Image files and paths
On modern computers and other devices like phones and tables, a casual user may not know where files are stored, or how the computer knows the type of each file. The computer’s operating system hides those details from us, and we can use search functions to find and access our files for us.
When we want to program our computers, however, we need to dig deeper and really understand how files are organized and labeled inside the computer. In this section, we will look at the hierarchical organization of files into folders, more formally called directories, and the use of filename extensions to indicate the type of the file.
0.3.1 Configuring your computer for easier access to directories and extensions
Both Mac OS and Windows default to hiding certain very helpful information from us. To make your life easier, follow the steps below to make filename extensions on, and to make sure that important folders, like your home folder, are immediately visible when you use the Finder or File Explorer.
Settings for Finder on Mac:
Open a Finder window by clicking on the Finder icon. If a window doesn’t automatically appear,
command-Nor New Finder Window under the File menu should work.Select Settings from the Finder menu, and click on Sidebar, and make sure that the following items are checked: Desktop, Documents, Downloads, and your home folder (whose icon is a house, and it is labeled with your username)
Select the Advanced section from Settings, and check the option that says something like Show all filename extensions
Select the View menu from the menu bar (at the top of the window), and look for the Show Path Bar/Hide Path Bar option. Make sure it is set to show the path bar. This adds a bar at the bottom of the finder window that shows the whole path to the folder or file you have currently selected.
Settings for File Explorer on Windows 11:
- Open the File Explorer (from taskbar, the Start menu, or the Windows logo key)
- Under the View menu, select Show/Hide and check the File name extensions option
- Just above the list of files in the current folder, the File Explorer has a “breadcrumb bar”. This bar shows the path to the current folder or file. You can right-click on this bar to copy the path.
- The Windows “Home” folder is not a real folder, but rather a collection of recent folders/files you have visited. Your actual home directory can be reached by going to This PC and then looking in the Users folder (or there may be a shortcut on your Desktop)
0.3.2 File extensions
Most files on a computer have a filename that includes an extension at the end that defines the type of data in the file. The extension is usually 3-5 characters long, always at the end of the name, and is preceded by a period. For example, Microsoft Word documents use the extension .docx, and HTML documents use .html. Plain text files use .txt, and Python programs use .py. The computer uses the extension to figure out how to work with the file. When you double-click on a file that ends in .docx, the computer knows to open the file with Word. Both Windows and Mac OS will label files with a thumbnail icon that represents the type of data, so in our day-to-day use we don’t need to read the actual extension. However, when we work with files in programming, we have to remember that the extension is an actual part of the name of the file.
Image files can be stored in many different formats, with PNG and JPEG the most common. Each format has its own way to store the data about the image, and uses its own method to compress the image data to make the file smaller. Thus, the computer has to know which format is used in order to read the data correctly.
When we write a program that reads in data from a file, whether that data is text, a spreadsheet, images, or sounds, we have to use the full filename, including the extension, so that the computer knows how to read and interpret the file’s data.
Note: You can’t change the formatting of the data in a file just by changing the extension on the file! You must use an appropriate tool to convert one type of file into another.
0.3.3 The file system
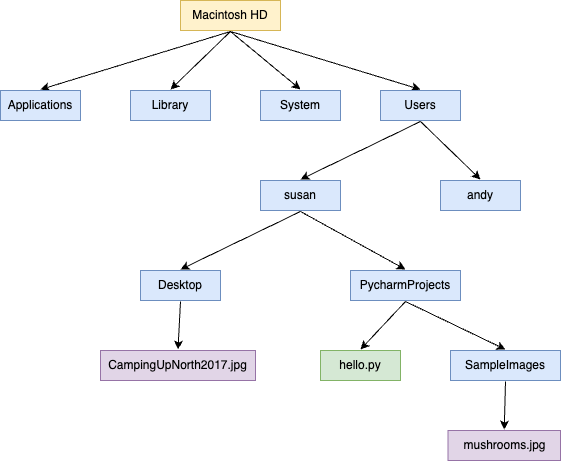
Computers organize the files on them in a hierarchical way: with files in folders, and folders in folders. Folders are more correctly called directories in computer science. The term folder came about as a user-friendly metaphor, and can be used interchangeably with directory. The form of the hierarchy is called a tree, the directory tree, because it has a similar shape to a family tree. Figure 3 shows a partial directory tree on a Mac (including just a few file/folders)
The top level of a computer is typically a directory containing a set of directories, one for each drive attached to the computer. Inside each of these folders is a hierarchy of folders and files organizing all the files stored on that device.
Your own user space on the computer is its own folder. On both current Macs and current Windows machines, this folder is (usually) located inside the Users folder, which is at the top level of your main drive.
Before continuing, take a few minutes to experiment with the file system hierarchy on your computer.
If you are on a Mac:
- Open a Finder window
- Look at the sidebar on the left, and find a section called Locations (if this is not visible, go into Settings and in the Sidebar section check all the options under *Locations)
- Click on the option that shows the name of your computer, with an icon that looks like your computer
- This should show you a directory containing your hard drive, and any other drives connected to your computer (including Network drives, external drives, flash drives, etc.)
- Click on the hard drive option; you should see folders for Applications, Library, System, and Users
- Find your home folder from here, and explore other folders as well
- Notice the path bar at the bottom of the Finder window shows the sequence of enclosing directories (the folders from the top level down to the file or folder you’ve selected)
If you are on a Windows machine:
- Open a File Explorer window
- Select This PC; this should show you a directory containing the drives currently connected to your computer
- Click on the main C drive, and you should see the top-level folders, including Users among others
- Find your home folder from here, and explore other folders as well
- Notice the path bar at the bottom of the Finder window shows the sequence of enclosing directories (the folders from the top level down to the file or folder you’ve selected)
When we write programs that read from files, we need to tell the computer how to find the files we want to read. We do this by listing the path of the file: a condensed representation of the sequence of directories that contain the file. This serves as directions for the computer: the path tells the computer how to go about finding the file.
In Python, as in many programming languages, paths are written as strings. Each string has a sequence of folder names, separated by a symbol. Mac OS and Windows use different symbols as dividers (of course they do!), but Python can make sense of the path even if you use the wrong symbols. On a Mac, we use the divide sign slash (/) to separate one folder from the folder it encloses, and we put a slash at the front of the string when we are giving the path from the top level (an absolute path, we will talk more about those a little bit later). On Windows, an absolute path starts with the identifier for the drive (for example, C:\) and then gives the sequence of folders, separated by the backslash symbol (\).
0.3.4 Example: using absolute paths
Suppose that I have all my Pycharm projects in a folder called PycharmProjects that is stored in my home directory. I have a project for this class called Comp194 inside the PycharmProjects folder, and it contains a Python code file, hello.py. Figure 4 shows the Finder, as if I have found this file starting at the top level of the computer’s hard drive. Note that this example and the one after use the directory tree structure from Figure 3 earlier.
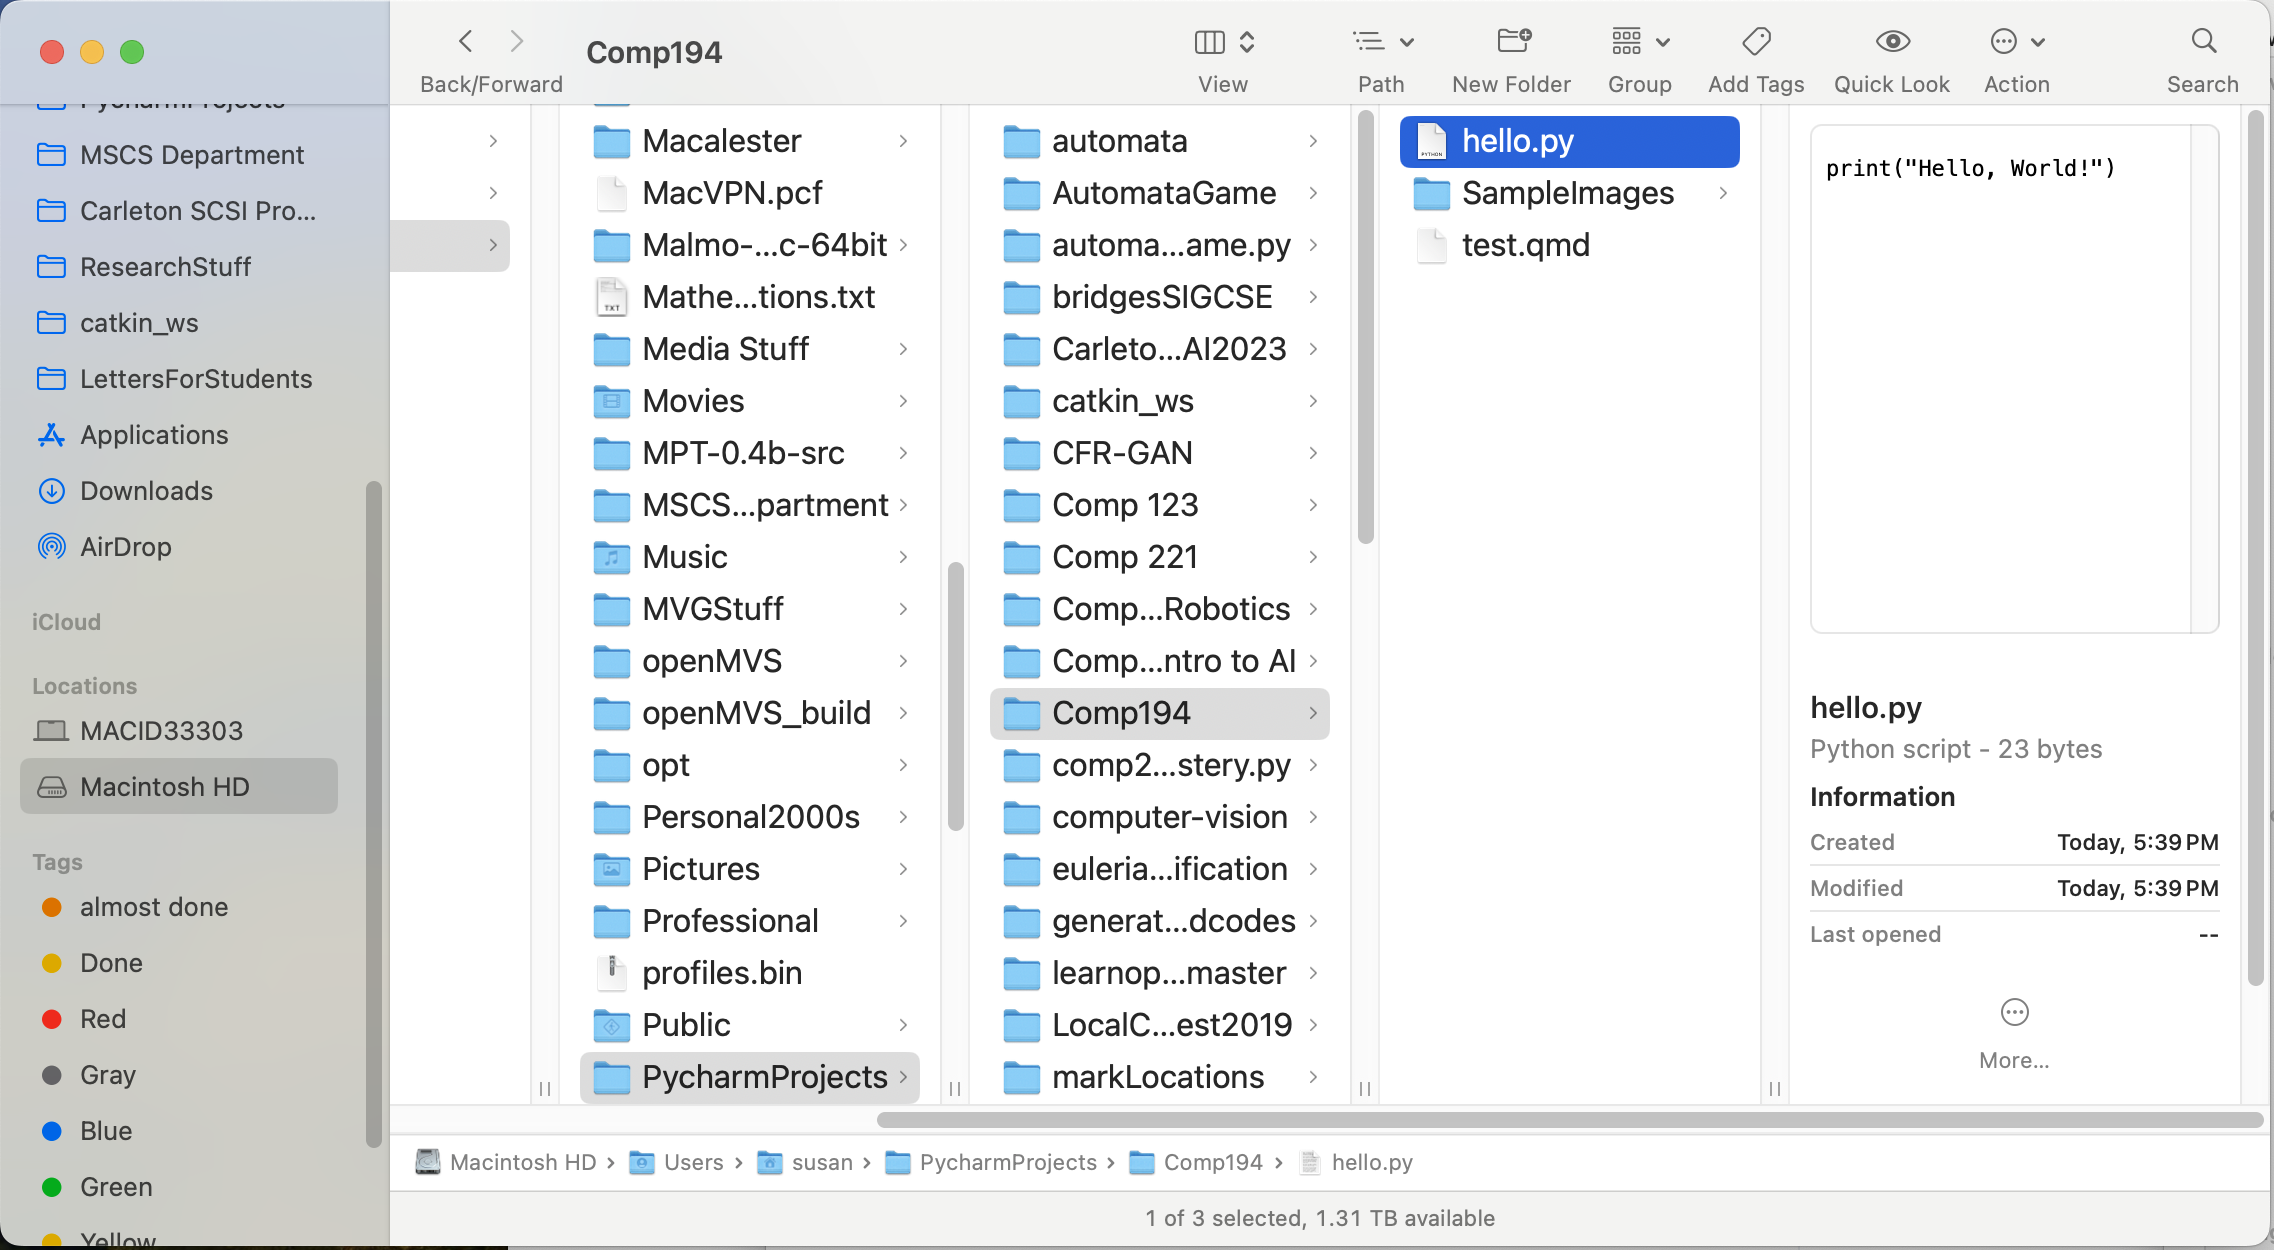
hello.py.
Notice the path bar at the bottom shows the absolute path, starting with the Users folder.
If we write this absolute path in Python, it would look like this:
"/Users/susan/PycharmProjects/Comp194/hello.py"
On a Mac, you can copy the path in this format, minus the quotation marks, by right-clicking (or holding control and clicking) on the name of the file in the path bar, and selecting Copy hello.py as pathname. On Windows, you can copy the path similarly by right-clicking on the breadcrumbs bar at the top of the window, or by typing shift-ctrl-c.
Try this for yourself: copy the path for a file on your computer, and paste it into a document where you can read it.
0.3.5 Absolute versus relative paths
An absolute path always starts at the top level of the drive where the data is stored. It completely specifies the location of a file or folder on the computer. It will always work, but it can get long and unwieldy to use. The example above was an absolute path.
When we are programming or working with a shell tool on the computer (Terminal on the Mac, Command Prompt or PowerShell on Windows), the program always considers itself to be in or focused on, a particular folder (the current working directory). For example, when we program in Python, the program is by default *in** the folder where the .py file is stored. Using the example from the previous section, if we run the hello.py program, the running program would be in the Comp194 folder.
Because of the current working directory context, we can sometimes use a relative path instead of an absolute one. Instead of specifying the full path from the toop level folder on the computer, we may describe the location of a file or folder as relative to the current working directory: the path starts at the folder we are currently in. To indicate that something is a relative path, we leave off the leading slash (on Mac) or drive identifier (on Windows).
0.3.6 Examples: relative versus absolute paths
Example 1: if the hello.py program wanted to read from the test.qmd file that is stored in the same folder, the relative path would just be "test.qmd", because the files are in the same folder: there is no need to travel through other folders to find test.qmd.
Example 2: suppose the program wanted to read in an image, mushrooms.jpg, from the SampleImages folder that is inside the Comp194 folder. The absolute path to this file would be "/Users/susan/PycharmProjects/Comp194/SampleImages/mushrooms.jpg", whereas the relative path from the code file would be "SampleImages/hello.py".
Example 3: Suppose the hello.py program wanted to open an image file, CampingUpNorth2017.jpg that is in the Desktop folder (see the directory tree in Figure 3). The Desktop folder sits inside the home folder, susan. Neither of these are inside the current folder Comp194, of course, so we somehow need to indicate in the path to go up the directory tree to a higher level.
Paths use the special marker .. to mean “go up one level in the directory tree.” In this example, we could either give an absolute path ("/Users/susan/Desktop/CampingUpNorth2017.jpg") or a relative one ("../../Desktop/CampingUpNorth2017.jpg"). There are two copies of the .. marker because of the way folders are nested: The first .. tells the program to go up one level, from Comp194 to PycharmProjects. The second .. tells the program to go up one more level, from PycharmProjects to susan. From there we can continue the path downwards as normal.
Remember: you can always use an absolute path safely, but relative paths can be shorter and easier to remember.
You will get lots of practice specifying paths and using filename extensions as we work with images.