Overview
This activity follows on the earlier functions activity, giving you more practice with defining functions, including some with nested for loops and accumulator variables. It will also ask you to practice with writing functions that are called by other functions.
Save all the functions you write into a single file for this activity: this will be the pattern going forward. Your file should have all necessary import statements at the top, followed by the function definitions, with explanatory comments included. At the bottom of the file, you should include the main script, using the if __name__ == "__main__": conditional, with all your script elements indented as a part of the conditional.
Functions with nested loops
Any Python construct can be put inside any other Python construct. You can put loops inside of functions, and loops inside of loops. Nested loops are a very useful pattern.
Copy the function below into your file.
Add calls to printPairs to your file. Try small values like 3 and 5, and figure out what happens.
The outer loop repeats n times, the inner loop repeats m times for each pass of the outer loop.
Thus, the number of lines printed is \(n\cdot m\).
Try this to hand in: Write a function called drawGrid, which takes in an image and two numbers. The function will draw a grid of squares on the input image, starting at (20, 20). The first number parameter, size is an integer that indicates how many squares to draw in each row and column, and the second number parameter is the width in pixels of each square. Make a gap of 20 pixels between each square.
- You will need two nested
forloops for this function: an outer loop that iterates over the rows (igoes from 0 tosize - 1, and an inner loop that iterates over each columns (jgoes from 0 tosize - 1) - Before starting to code, work through an example or two by hand with a teammate, until you can figure out how to calculate the upper-left and lower-right corners for each square from
i,j, the square size, and the 20-pixel gaps. Figure 1 gives the start of one example, where the square size is 40 pixels.
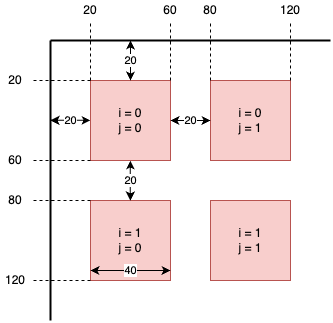
drawGrid, for square size of 40
- Inside each square in Figure 1 is written the loop variable values for that square
- Notice that, no matter what the upper-left corner (x, y) coordinates are, the lower-right will always just be (x + 40, y + 40)
- The upper-left x values for the first row would be: 20, 80, 140, 200, 260, …
- The upper-left y values stay the same for the first row, but increase for each row: 20, 80, 140, 200, 260, …
- Write out a formula to compute the upper-left
xin terms ofiand the same for upper-leftyin terms ofj - Write the two
forloops as described above, one indented inside the other. - Inside the outer loop, compute the upper-left
yvalue according to your formula - Inside the inner loop, computer the upper-left
xvalue according to your formula - Call
cv2.rectangleto draw the square (you can pick the color)
Other than the color of the rectangles, your results should match the two examples in Figure 2
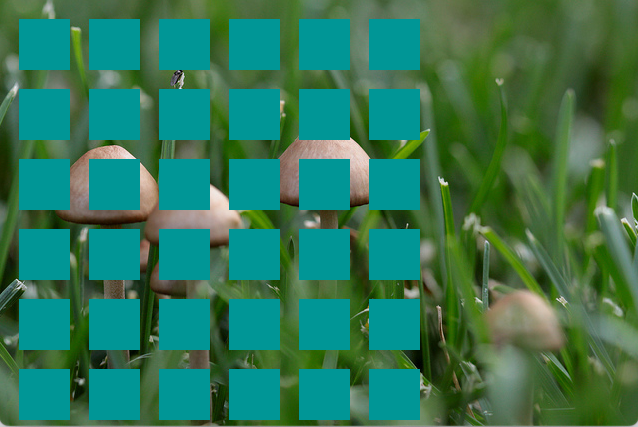
drawGrid(img, 6, 50) results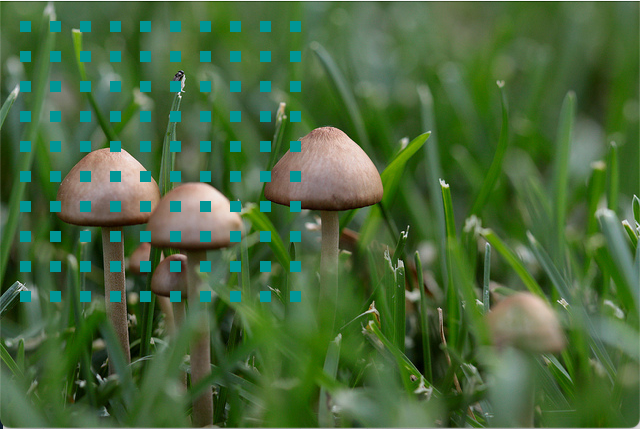
drawGrid(img, 10, 10) resultsdrawGrid: (a) created a 6x6 grid with squares 50 pixels wide, and (b) created a 10x10 grid with squares 10 pixels wide.
Accumulator variables
We have already been using the accumulator pattern, so here we will look at it in the context of a function, and we will focus on practicing debugging skills.
Below is an example of a function that includes a for loop and an accumulator variable. It has three bugs in it. Some might be syntax errors, or will cause a runtime error, some may be logical errors.
This function is supposed to add up the numbers in a list, and return the sum at the end.
Try this to hand in:
- Write 4 sample calls to
sumListNumsand try running them, include lists that are all numbers and mixed lists - What happens if you pass an empty list into the function?
- Use one of the tracing methods you learned last time to trace this function and find the three bugs
- Mark each buggy line, and correct the bug
- Ask for help if you get stuck!
Functions that call other functions
We build programs in Python out of collections of functions. One function calls another function to do part of the work.
Because writing programs accurately is difficult and time-consuming, one program design principle is to avoid writing the same code over and over. If you write the exact same statements in more than one place, then you have to debug each place separately. It is often worth your time to package those statements as a function, so that you can debug it once, and then only have to call the function for every use. Because functions have meaningful, descriptive names, calling functions can also improve the readability of your code, by substituting a single descriptive name for lines of code.
Try this to hand in: You have been provided with a starter program in stickMonsters.py. This program has 5 functions, plus a main script. We have provided three of functions for you: drawStickFigure, drawMonster, and computeHeadOffsets. You will implement the other two: drawOneHead and drawHeads. Below we have provided the drawStickFigure function, as a core element of the code.
def drawStickFigure(img, startPos, color):
"""Takes in the image to draw on, a reference point on the stick figure (at the base of the neck/shoulders),
and a color, and it draws the stick figure at that position."""
(sx, sy) = startPos
drawHead(img, (sx, sy - 50), color)
cv2.line(img, (sx, sy - 10), (sx, sy), color, 2)
cv2.line(img, (sx, sy), (sx, sy + 100), color, 2)
cv2.line(img, (sx, sy), (sx - 50, sy + 50), color, 2)
cv2.line(img, (sx, sy), (sx + 50, sy + 50), color, 2)
cv2.line(img, (sx, sy + 100), (sx - 50, sy + 175), color, 2)
cv2.line(img, (sx, sy + 100), (sx + 50, sy + 175), color, 2)- 1
- Draw the head, 50 pixels up from reference point
- 2
- Draw the neck, connecting head to reference point
- 3
- Draw the main body line
- 4
- Draw the left arm
- 5
- Draw the right arm
- 6
- Draw the left leg
- 7
- Draw the right leg
Spend some time examining the drawStickFigure function: make sure you understand how we are using offsets from the reference point, which is where the neck meets the shoulders. You will need to do something similar for the functions you implement!
Notice that drawOneHead, drawHeads, and computeHeadOffsets are helper functions, because they are called from other functions. For testing purposes, we can call them directly from our main script, but they also need to serve the other functions well.
Figure 3 shows four sample outputs of this program. In each case, we varied the number of heads to draw on the monster. While your face features may vary from this, the placement of the heads should match this output.

stickMonsters with 1 head passed to drawMonster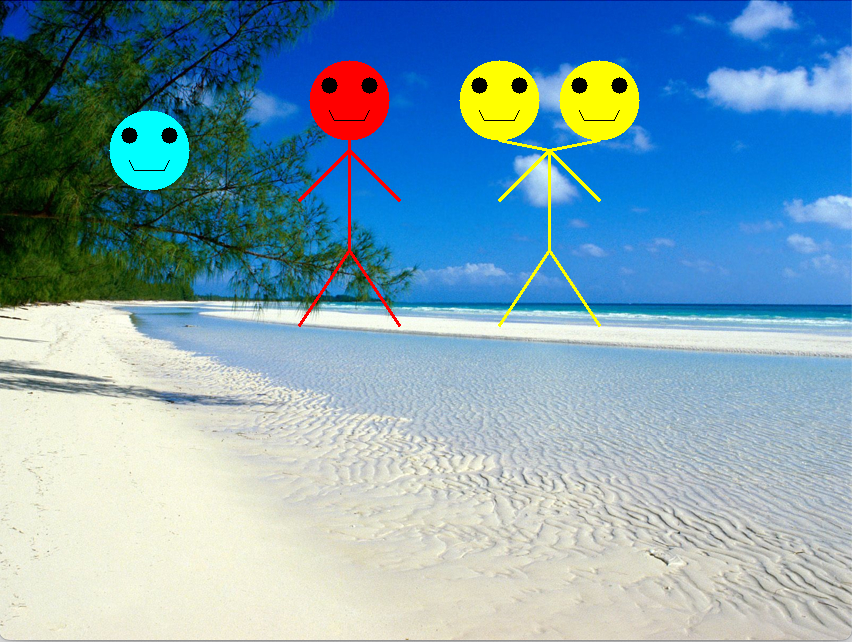
stickMonsters with 2 heads passed to drawMonster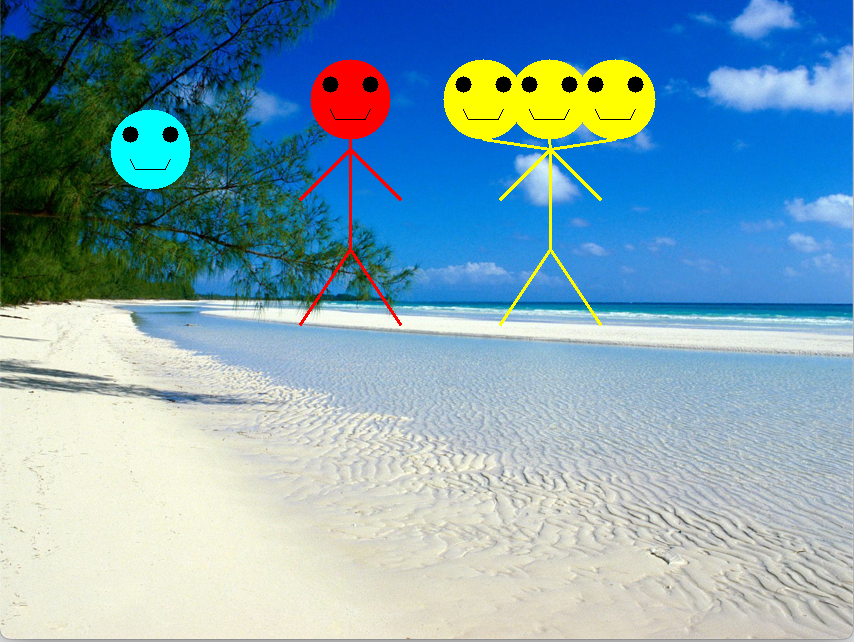
stickMonsters with 3 heads passed to drawMonster
stickMonsters with 6 heads passed to drawMonsterstickMonsters, changing the number of heads passed to the call to drawMonster.
Implement drawOneHead
Your first task is to implement the drawOneHead function. It takes in an image to draw on, the coordinates for the center of its circle, and the color for the head. It should do the following:
- Extract the
xandyvalues from thecentercoordinates, much like we do at the start ofdrawStickFigureordrawMonster. - Draw a filled-in circle centered on
center, in the givencolor, and with a radius of 40 - Draw a left eye and a right eye, in black, as circles. Compute their locations as offsets from the center x and y
- Draw a smile, using 2, 3 or more lines, in black. Again, compute the line endpoints as offsets from the center x and y
Run the program repeatedly to check your work on the head and to debug it. When working, your output should match the cyan head and red stick figure fairly closely (You can choose different eye sizes or positions, and smile detaiils).
Implement drawHeads
The drawHeads function will draw a series of heads and their associated necks. It will make a function call to drawHead for the actual head drawing. We want to evenly spread the heads out up to 100 pixels to the right or 100 pixels to the left of the stick figure’s center line. Follow the steps below to implement this.
- Extract the
xandyvalues fromrefPos, similar to what we did before. - Call the helper
computeHeadOffsets, and pass itnumHeads, and 100 for the “spread” we want. This function will return two values, so put two variables on the left side of an assignment=to catch the two return values. The first return value is the “left X offset” and the second return value is the region size. - Add a
forloop: the loop variable here will be the x offset for the next head to draw (we will add this to the x coordinate of the reference point). Use therangefunction here, with the “left X offset value” as the starting value, 100 as the stop value, and the region size as the step value). - Inside the for loop, call
drawOneHeadand pass it the image. the correct (x, y) coordinates are:- the center x plus the loop variable
y - 50(because we want the head to draw 50 pixels above the reference point)
- After drawing the head, add in a line for the neck. Use the same x value as the head, but
y - 10, which is the bottom of the head, as the starting point, and draw the line back to the reference pointrefPos
Test your function on 1 through 6 heads on your monster. Use the tracing methods you learned earlier to help you debug your new program.
What to hand in
You should have two files for this activity, one that contains your work, plus the edited stickMonsters.py:
- Your file containing definitions of
printPairsanddrawGridand the debugged version ofsumListNums - The completed
stickMonsters.pyfile
Use commit and push to copy your code to Github to submit this work.