- 1
- Loop variable and collection to loop over
- 2
-
Loop body The word after
formust be a variable name. This special variable is the loop variable. The next word must bein, and then we must specify an iterable data type. Sequences like lists and strings are iterable, and functions like therangefunction are iterable as well (when called by the loop, it produces a sequence of values).
Overview
In this activity, you will practice with for loops and closely related ideas about sequences and accumulator variables, particularly applying them to images. This is our first control structure, programming tools that change the line-by-line, step-by-step process of evaluating a program. In this case, a for loop allows us to repeat a set of statements over and over again. Loops, like other control structures, are essential for making our code concise and efficient to write.
To avoid repeated typing, and the chance for errors to creep in, we use loops to tell the computer to repeat some actions. The for loop in Python is very convenient. It has a very specific syntax (the parts shown with angled brackets around them are placeholders, not part of the syntax:
Note: Complex statements in Python, like these, always have a first line that starts with the keyword that defines the statement (for, in this case) and the first line always ends with a colon (:).
Exploring the range function
The range function is used in for loops to generate a sequence of integers. It works in a way similar to string or list slicing, though not with the same syntax.
Try each of the following, by copying it into a code file in PyCharm and running it. Vary the values and try to predict the output.
A simple use of range to count:
Counting upward, but not starting at 0:
Counting while skipping:
Try this to hand in: Make a new script file, and create the following for loops that use the range function:
- Create a
forloop like the ones above that prints the values from 100 to 200 - Create a
forloop like the ones above that prints the values from 1000 to 2000 - Create a
forloop like the ones above that prints the multiples of five starting at zero and going up to include 100 - Create a
forloop that counts down from 10 to 0 (challenge one)
Repeating an action N times
The for loops in the previous section are the simplest form: just using a loop variable to repeat something a fixed number of times. We often use simple variable names for the loop variables with this kind of loop, like i, j, or k.
Here you will practice with using this kind of loop when drawing on an image.
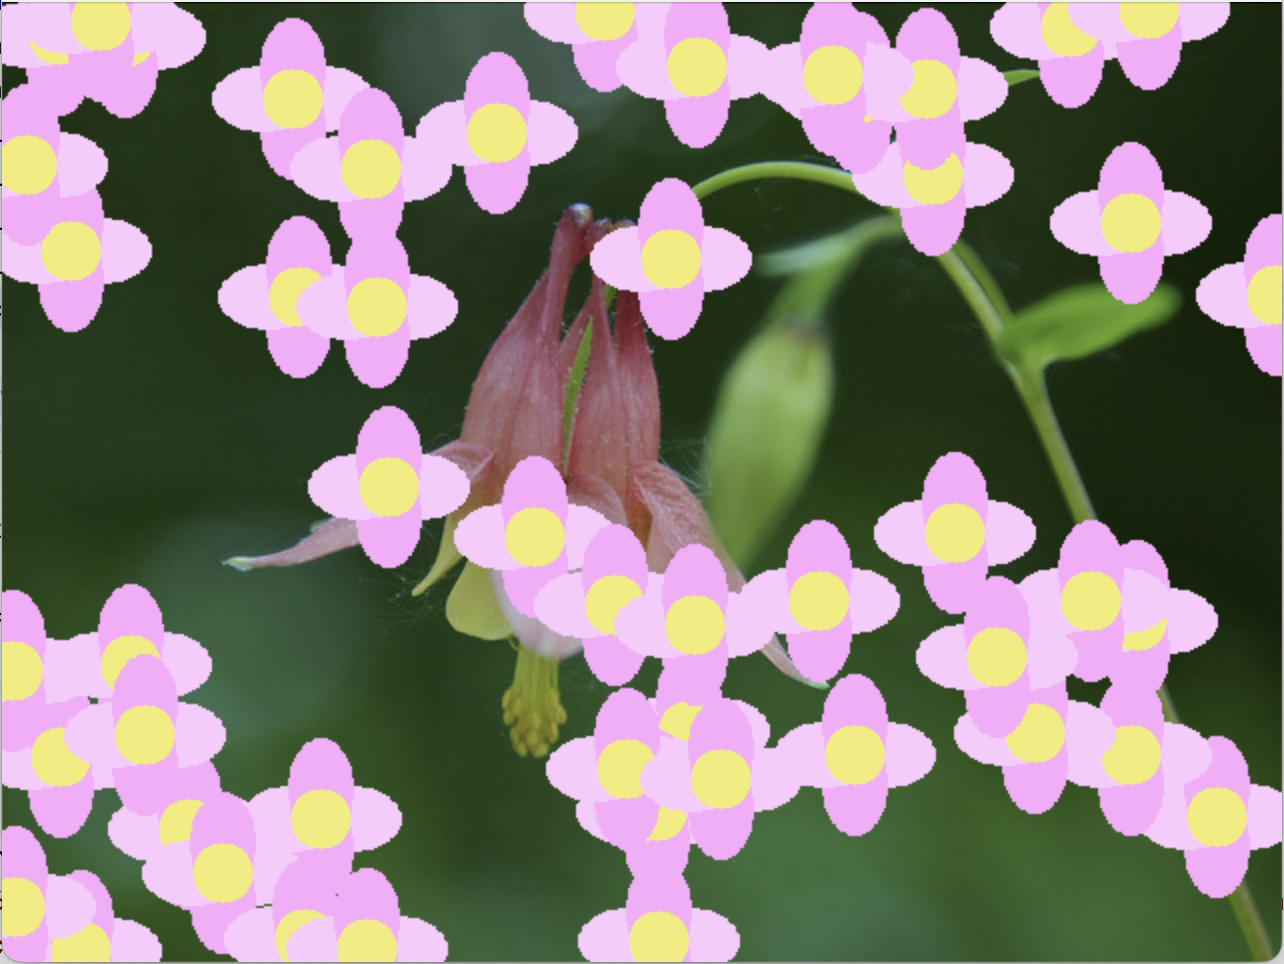
Try this to hand in: Examine the starter code shown below, and provided in flowerScatter.py.
import cv2
import random
bkgrndImg = cv2.imread("SamppleImages/wildColumbine.jpg")
cx = 150
cy = 150
cv2.ellipse(bkgrndImg, (cx + 15, cy), (25, 16), 0, 0, 360, (252, 202, 252), -1)
cv2.ellipse(bkgrndImg, (cx, cy + 15), (25, 16), 90, 0, 360, (252, 170, 252), -1)
cv2.ellipse(bkgrndImg, (cx - 15, cy), (25, 16), 0, 0, 360, (252, 202, 252), -1)
cv2.ellipse(bkgrndImg, (cx, cy - 15), (25, 16), -90, 0, 360, (252, 170, 252), -1)
cv2.circle(bkgrndImg, (cx, cy), 15, (114, 236, 242), -1)
cv2.imshow("Flowers", bkgrndImg)
cv2.waitKey()- 1
- Sets the center point of the flower
- 2
- Draws four ellipses for petals, each a fixed offset in a different direction from center point
- 3
- Draws the flower center
Run the flowerScatter.py program and see what it does.
First, we are going to change how the center point is specified. In the original code, cx and cy are set to a fixed value: every time you run the program, the flower appears in the same place. We are going to change those two lines, so that cx and cy are set to random values in the range of the width and height of the image. This image is 640 pixels by 480 pixels. Use the randint function from the random module to generate a value for cx between 0 and 639, and a value for cy that is between 0 and 479. (If you don’t remember how to use randint: ask for help!)
Next, we are going to add a for loop to repeat all the lines from line 6 to line 12. Add the loop before line 6, using the loops from the previous section as models. Make it loop 10, 20, or even 50 times. Select the lines from 6 to 12 that we want to repeat, and indent them by hitting tab on your keyboard.
Test your program until it does what you want. You should see something like the picture in Figure 1.
Looping over lists
Another common pattern for a for loop is to build a list of data, and then use that as the sequence for the loop. When we do this, the loop variable is assigned to the values in the list, one at a time, and it repeats the loop body once for each value in the list. We typically choose a name for the loop variable that describes what it contains, even if that is just val. This helps human readers to distinguish this kind of loop from the earlier type (Python doesn’t care).
Try the example below to see how this kind of loop works.
Hello and welcome Cindy
Hello and welcome Marco
Hello and welcome Fatima
Hello and welcome Thomas
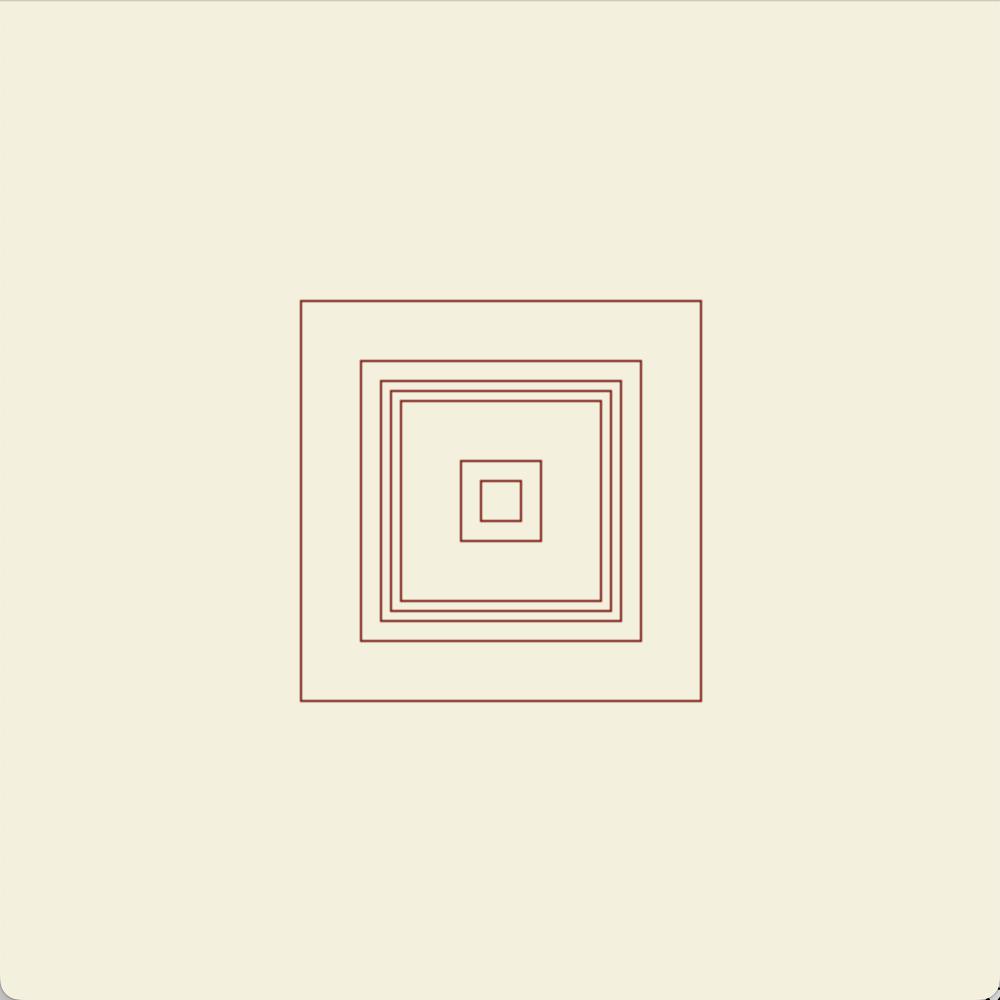
Hello and welcome YutongTry this to hand in: Start with the code snippet shown below, and included in the squares.py file. It creates a blank image using zeros and sets it to a light beige-yellow color. Notice the squareSizes list. It contains a set of side lengths (half side lengths, actually) for the squares we want to draw, centered in squareImg. They are not the same distance from each other, so we can’t use the range function to generate them.
This code snippet also includes a comment marked with TODO. TODO statements are used in programming to mark a place where a change needs to be made: adding a feature, etc. We will use them at times to help indicate where in the code we want you to make changes, and what you should do. Remove the TODO comment when you finish implementing and testing the step.
First of all, create a for loop that has squareSizes as its sequence, with a loop variable called hSide (short for “half side”). Using incremental development, start by having the loop just print the value of hSide so you can check if the loop is working correctly before going on to the next step.
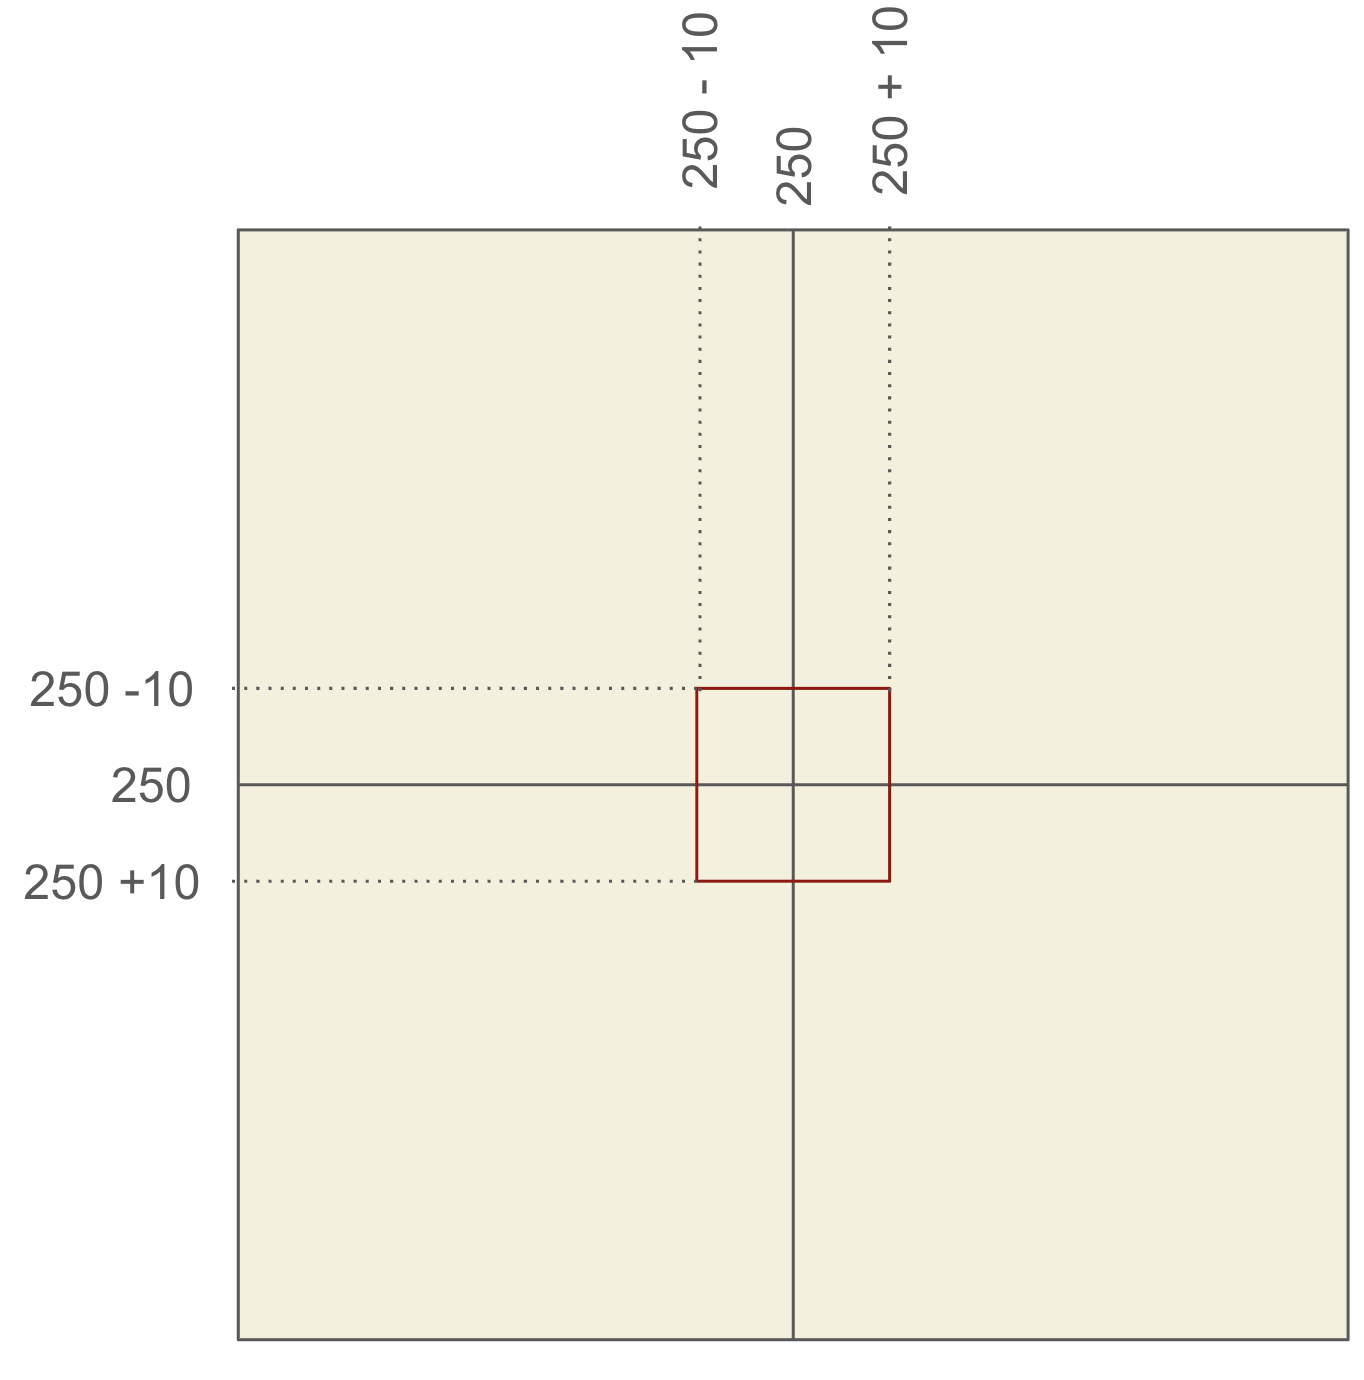
Once you are sure the for loop is correct, change the body of the loop to a call to cv2.rectangle. We need to give the upper-left and lower-right corners of the rectangle in order to draw it. We want each square to be centered on the midpoint of the image: (250, 250). Therefore, we need to calculate the upper-left corner coordinates, and the lower-right corner coordinates, as offsets from the middle. Figure 2 shows how this works for the first value of hSide: 10. If we subtract hSide from 250 for both x and y coordinates, that will give us the upper-left corner of the square, and if we add hSide to 250 for both x and y, we get the lower-right corner. These are the two points we need to pass to rectangle.
Use the color (0, 0, 128) to get a dark red color for the square, and do not draw them filled in.
Your final output should look like Figure 3.
Accumulator variables and for loops
An accumulator variable is an extra variable, not the loop variable, that collects values across the iterations of a loop. Below is a simple example, where the loop variable counts from 30 to 40, and the accumulator collects the sum of all the values the loop variable takes on.
- 1
- Initialize accumulator before loop
- 2
- Update accumulator inside loop
385Notice the three key features of an accumulator variable:
- The accumulator variable is created and set to an initial value before the loop
- Inside the loop, often at the end, we update the value of the accumulator. This usually means combining the old value of the accumulator with a new value.
Read the example below, included in your starter files as accumExamp.py. It uses two accumulator variables to calculate positions for a series of lines. It also uses an in-loop variable that sets the color with a formula based on the loop variable.
Before running this program: Read through this program line by line, and figure out what the values of each variable should be during the first pass through the for loop. Discuss with your teammates, and predict what the picture should look like. Then extend that to the other runs of the loop. Only after that, run the program and see if you were right.
If you can’t predict what the lines of code will do, try adding print statements so that you can see the values of the variables from one step to the next. Adding explanatory strings to your print statements will help!
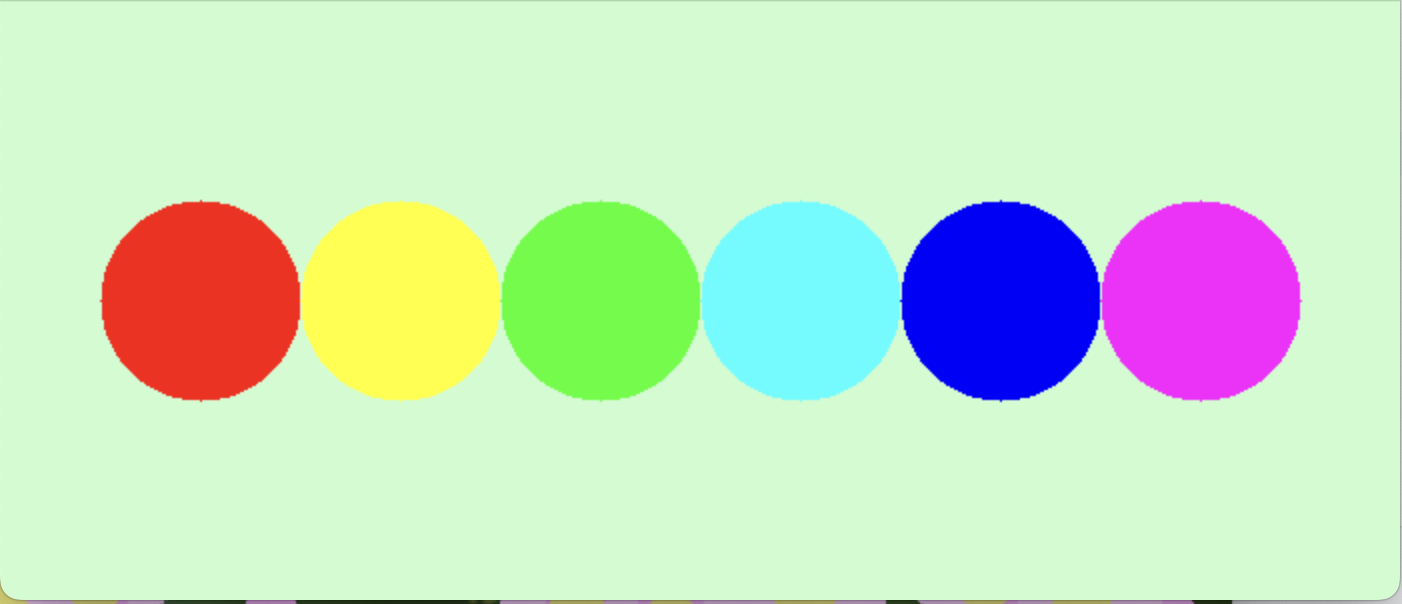
Try this to hand in: Modify the circleLine.py file. The starter script will make a custom light-green blank image, and will then draw a line of circles, each of a different color, spaced out across the image, as shown in Figure 4.
import cv2
import numpy as np

image = np.zeros((300, 700, 3), np.uint8)
image[:,:] = (206, 252, 202)
colors = [(0, 0, 255), (0, 255, 255), (0, 255, 0), (255, 255, 0), (255, 0, 0), (255, 0, 255)]

# TODO: Add for loop here to draw six circles as described in activity

cv2.imshow("Circles", image)
cv2.waitKey()
You should replace the TODO comment with a for loop that repeats six time with i as its loop variable. Inside the loop:
- Define a variable to hold the ith color in the
colorslist - Calculate the center x value according to this formula: \(x = 100 \cdot (i + 1)\)
- Draw a filled-in circle on the
imagewith the calculated x value, and a y value of 150, a radius of 50, and the selected color
Feel free to change the six colors in the colors list if you like: I chose simple, bright colors that are the extremes in value (other than black and white).
Your program should produce something that looks like Figure 4
Simple movement
We can create simple animations by keeping a background image the same, and then drawing and redrawing shapes in different pictures on the same original background. Each time through the loop, we prepare a new frame and display it. We need only two new tools to implement a simple animation: copying images, and having delaying the speed for displaying each frame long enough for us to see it.
Copying an image
Once an image has been read into Python by OpenCV, you can use a copy method to make an exact copy of it. Changes to the copy will not change the original! With this, we can load a background image, and then make a copy of it before drawing. We only draw on the copy, and we only display the copy. The original stays pristine and unchanged, so each time through the loop we can make a fresh copy.
Delaying rather than stopping
Up until now, when we display an image, we have called waitKey to stop the program until we hit a key to make it continue. We have not passed any value to waitKey. However, waitKey actually takes an optional input. When given a positive integer, it pauses for that many milliseconds to see if the user is going to hit a key. If they do not, then it continues after the specified pause. You can experiment with different amounts of milliseconds to get movement that appears smooth, but I recommend a value no smaller than 10, and 30 to 50 is a reasonable range.
Try this to hand in: Your final task for this activity is to draw an ellipse to look like a flying saucer, coming in to land in front of the Grand Teton Mountains. Below is a description of the program you are to create, written in pseudocode. Use the skills you have been practicing up to this point to implement this program (in a new Python file).
- Import the
cv2module - Read in the
grandTeton.jpgimage and save it in a variable - Repeat the following 50 times
- Assign a new variable to hold a copy of the original image
- Calculate the (x, y) coordinates for the center of the ellipse as: \(x = 10i+10\) and \(y=5i+10\)
- Draw an ellipse on the new copy, with (x, y) for the centerpoint, and with axes of size 50 and 15, and color (245, 245, 175) (determine the other input values based on the example output below)
- Display the copy
- Wait for 30-50 milliseconds
- (After the loop) Display the image again
- Wait, as normal, for the user to hit a key
Your program should produce a series of pictures of the pale blue ellipse moving across the scene. Figure 5 shows a GIF of what the program should produce.

What to hand in
You should have multiple Python files for this activity. At the very least, you must have:
- A file containing your simple loops using
range - The
flowerScatter.pyfile, modified as directed - The
squares.pyfile, modified as directed - The
accumExamp.pyfile, with any experiments you performed - The
circleLine.pyfile, modified as directed - A file containing the flying saucer script
Use commit and push to copy your code to Github to submit this work.