Overview
This assignment is individual work!
- Do not share or borrow solutions from other students.
- Do not use AI assistants to generate code for you.
- Do ask preceptors and instructors for help with the code, including what to write and debugging.
- Do ask peers or AI assistants for help in understanding error messages, but not for help in writing or debugging your work.
This homework assignment will ask you to demonstrate your skills at understanding, debugging, planning, and creating python scripts and function. The list of topics for this assignment include:
- While loops
- Connecting and processing frames of video from files or webcam
- Image processing and transformations including:
- masking and thresholding images
- geometric transformations
- image filtering
- motion and color tracking
To hand in: You will use the Homework 3 Github Assignment to set up this assignment, and to push your code to save it to the cloud, to hand it in. Note that all your work will go into a single file for this assignment. A starter file, hw3Code.py will be provided, add your work there, and test your work with the hw3Checker.py file.
Handling images: I will provide in the Github assignment just those images you need to have to do this assignment.
Question 1: Implementing the bubbleMix function
For this question, you will implement a function, bubbleMix, that will combine two images using masks. Your function will take two images as inputs, and will do the following general steps (more details about each step below):
- First, you will crop the two pictures so that they are the same size, as large as is possible given the images’ dimensions
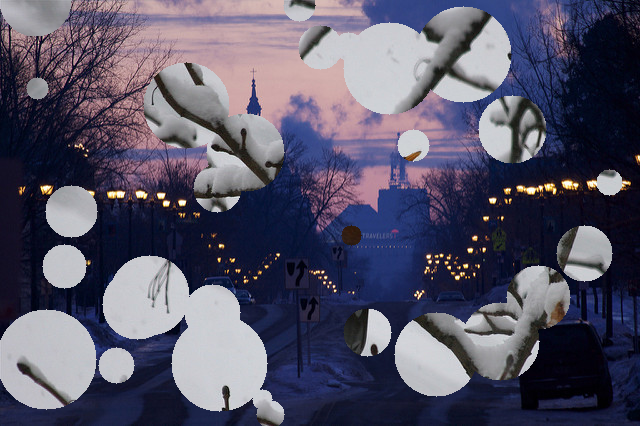
- Next you will create a mask and its inverse: the mask will be black with 30 white random circles draw on it
- You will use the two masks to select the parts of one image that are outside the circles, and the parts of the other image that are inside the circles
- You will add the two images together to combine them
- Finally, you will return the combined image
Combining part of an image with another
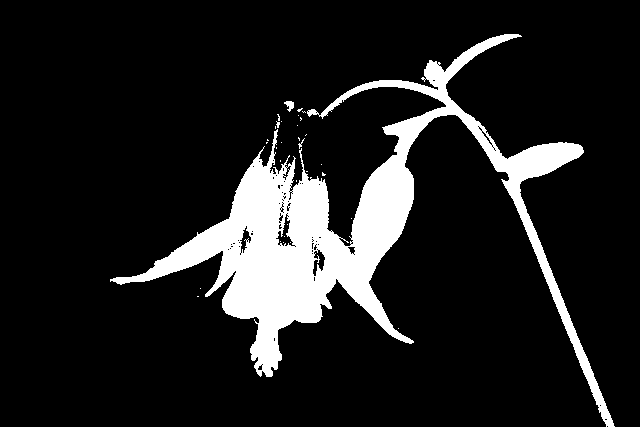
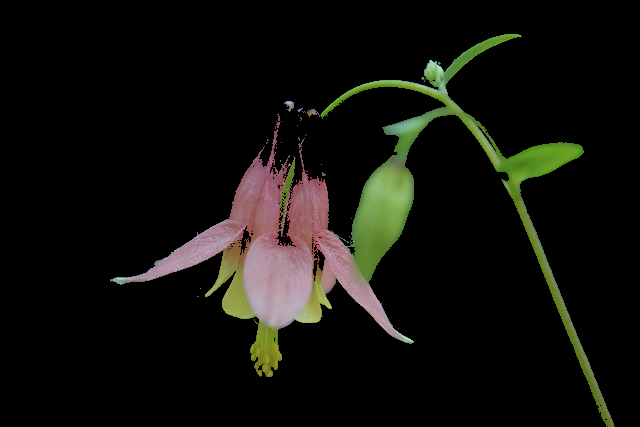
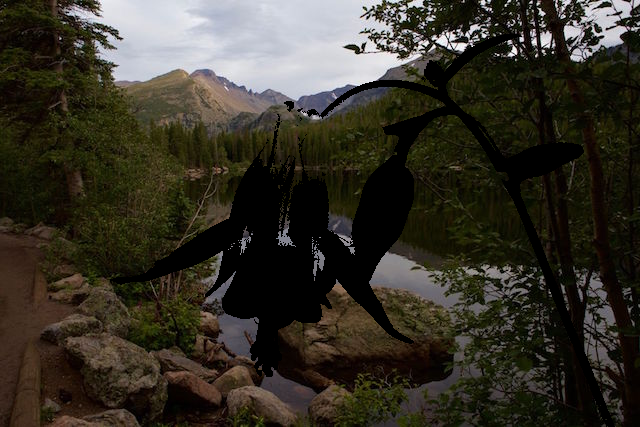
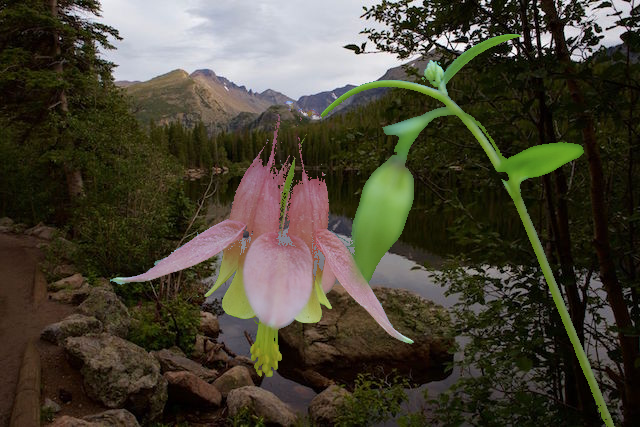
Suppose we wanted to combine part of an image with another: like placing the outline of our wild columbine flower onto the Bear Lake background (the original images are shown in Figure 1).

wildColumbine.jpg
bearLake.jpgIf the shape were rectangular, we could use slicing to redefine a portion of the background picture. But the flower is not at all rectangular! In this case, we can use masking to combine the images.
- We make a mask where the white pixels are exactly the parts of the foreground image we want to keep and copy to the background. The mask in Figure 2 was made with the
thresholdfunction. - We make another mask that is the opposite of the first: black where the first was white, and white where it was black
threshold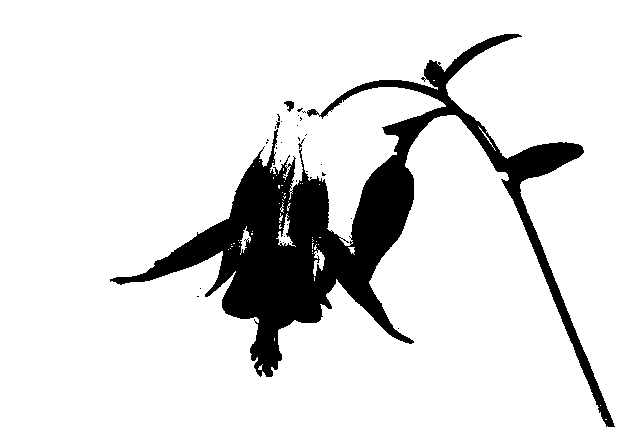
(255 - mask1)threshold and the other made as the negative of the first
- Next, we apply the first mask to the wild columbine picture, and the second mask to the Bear Lake picture, producing results shown in Figure 3. The two images complement each other: where one image has black pixels, the other has color, and vice versa.
- Now, if we just add the two masked images together, we will have black (0, 0, 0) added to a color at every pixel location. So the colors never conflict!
You are going to implement this process in this function, with a mask made of random circles.
Cropping to a maximal width and height
To crop two images to the same size, we are limited by the dimensions of each image. The largest possible crop will have a height that is the smaller of the two images’ heights, and a width that is the smaller of the two images’ widths.
- Get the dimensions of each image
- Find the smaller width and smaller height
- Crop each image to have that width and height (using Numpy slicing)
Making a mask with circles on it
For the next step, you want to make a black image the same size and type as the cropped images (make sure it has three channels to simplify things). Then, write a loop that will draw random circles on the image:
- Repeat 30 times
- Pick a random radius from a reasonable range (in my examples I used radii between 10 and 50)
- Pick random starting positions that are in the image (circles can be cut off by the edge of the picture, but should be partially visible)
- Draw a white circle on the black image
Making the negative mask
To make a negative of the original mask, subtract the mask from 255. Where the original mask was white, we will be subtracting 255 from 255, producing 0. And where the original mask was black, we are subtracting 0 from 255, producing 255.
Applying the masks to the images
Use cv2.bitwise_and to combine the cropped version of the first image with the first mask, and then combine the cropped version of the second image with the second mask.
Add the two images together
The last step is to add the two images together, and to return the result!
Below is a sample call to the function, and the final result.
Specifications for Question 1
Base specifications:
- Solution defines a function called
bubbleMix - Function header correctly specifies the name and inputs for this function
- Function correctly crops both images to be the same (maximal) size
- Function correctly constructs the first mask with random circles, and its opposite
- Function correctly applies masks to cropped images
- Function correctly adds the masked images together
- Function returns the final resul
Extended specifications:
- Code includes a triple-quoted docstring that describes the function’s input, purpose, and results
- Student name is at the top of the file
- Any completed TODO comments have been removed
- File format has appropriate style:
importstatements at the top- then function definitions with no script elements
- then the main script, all insidde the
if __name__ == '__main__':statement
Ratings:
- To receive a gold rating, complete at least 8 specifications, at least 5 of them base
- To receive a silver rating, complete at least 7 specifications, at least 4 of them base
- To receive a bronze rating, complete at least 6 specifications, at least 3 of them base
Question 2: Annotating a complex program
In the hw3Code.py file, there is a program called getBox. It has four helper functions that help it to perform its purpose.
We’re not going to tell you what getBox does. Your task is to figure out what this program does, at a high level, and in the details of the code.
- Run the program
- Read the code
- Make a copy of the code and experiment with it (keep the original to come back to)
Figure out how to interact with the program, what the goal of the program is, and what each section of code does.
Then, add annotations and descriptive docstrings as indicated in the code file.
- Be detailed
- Do not just paraphrase what the lines of code say: focus on the purpose of each section of code
- Docstrings for function calls should describe what the inputs are and any return value, as well as the purpose of the function
Specifications for Question 2
Base specifications:
- Docstring for
getBoxis detailed, accurate, and formatted as a triple-quoted string positioned right below thedefline - Docstring for
initCanvasis detailed, accurate, and formatted as a triple-quoted string positioned right below thedefline - Docstring for
onTargetis detailed, accurate, and formatted as a triple-quoted string positioned right below thedefline - Docstring for
moveTargetis detailed, accurate, and formatted as a triple-quoted string positioned right below thedefline - Docstring for
showFinalis detailed, accurate, and formatted as a triple-quoted string positioned right below thedefline - In the
getBoxfunction you have written at least 3 detailed, accurate hash-mark comments - In the
getBoxfunction, you have written at least 2 additional detailed, accurate hash-mark comments - In the
getBoxfunction, you have written at least 2 additional detailed, accurate hash-mark comments
Extended specifications:
- Student name is at the top of the file
- Any completed TODO comments have been removed
- File format has appropriate style:
importstatements at the top- then function definitions with no script elements
- then the main script, all inside the
if __name__ == '__main__':statement
Ratings:
- To receive a gold rating, fully complete at least 8 specifications, at least 6 base, partially complete at least 1 more
- To receive a silver rating, fully complete at least 7 specifications, at least 5 base, partially complete at least 1 more
- To receive a bronze rating, fully complete at least 6 specifications, at least 4 base
Question 3: Completing a multi-function program, using pseudocode
Under Question 3 in the hw3Code.py file, there is a partially-completed program. We have provided the main function, findBall, and a helper, applyBounds. You will be implementing three helper functions (all three are very similar to each other).
You learned about using lower and upper bounds on an HSV image with the inRange function, to identify the location of a colorful object in an image. You may remember that figuring out the best bounds can be very tricky.
The purpose of this program is to help the user to select the right hue, saturation, and value ranges to isolate the ball from everything else. The main function cycles through the channels of an HSV image (hue, saturation, and value), allowing the user to try different bounds for each channel in turn, and displaying the result. In the end, it returns the new bounds, as well as the center position and radius of the final circle that was discovered, marking the location of the ball.
The applyBounds function does most of the work of processing and displaying the images. It does these steps:
- It uses
inRangeto make a threshold image based on the current values for the lower and upper bounds - It calls
findContoursto find all the closed curves in the threshold image - It searches the contours to find the largest contour that was found
- It draws that contour on a copy of the original image
- It finds the smallest enclosing circle for the contourl and draws that as well
- It displays some text on the image to show the user what is happening
- Finally, it returns the image, along with the center position and radius of the circle it has drawn
Your task will be to implement the three helper functions that help the user to adjust the hue thresholds, the saturation thresholds, and the value thresholds. I will provide you with pseudocode for all three functions just below, and a few sample calls to show what results the user should be able to construct.
Hints:
- Display all images here in a single window called
"Ball Finder"for simplicity - Remember that you can’t modify tuples, you will need to rebuild them each time you make a change
- There is a cryptic but clever programming “hack” for times when you need a value to stay above (or below) a certain value. Suppose I am adding one to a variable
x, and I want to make sure thatxnever goes over 100. I could write the following statement by itself to do this:
Pseudocode for adjustHue
The adjustHue function takes in the image (in BGR format) and two tuples (the lower and upper bounds for inrange). It should loop until the user presses the space bar to go on. Each time through the loop it displays the current contour found, and lets the user alter the range of hues.
We know that inRange works best with a narrow range of hue values. So we will represent a single hue, the middle of a range of 20 hue values, and we will calculate the lower and upper bound from that middle hue. The user will change the hue by hitting either the w or the s key: w will increase the hue value by 5, s will reduce it by 5.
Here is the detailed pseudocode:
Algorithm adjustHue(image, lowerBounds, upperBounds)
1. Let currHue be the average of the input lower-bound hue and the upper-bound hue
2. Loop until the user indicates to quit
3.     Call applyBounds and pass it image, lowerBounds, upperBounds, and a string "Adjusting hue"
4.     Save the results of the call in three variable, newIm, center, radius
5.     Display newIm with imshow
6.     Use waitKey to pause and to get a key value from the user
7.     If the user hit the space key, then break out of the loop
8.     If the user hit the 'w' key then:
9.          Add 5 to currHue, but make sure it doesn't go over 170
10.         Create a new set of lower bounds, updating its low hue value to currHue - 10
11.         Create a new set of upper bounds, update its high hue value to currHue + 10
12.    If the user hit the 's' key then:
13.         Subtract 5 from currHue, but make sure it doesn't go below 10
14.         Create a new set of lower bounds, updating its low hue value to currHue - 10
15.         Create a new set of upper bounds, update its high hue value to currHue + 10
16. After the loop ends, return the final lower bounds and upper bounds, and the center point and radius of the circle
from applyBounds
Pseudocode for adjustSat
This function will be very similar to the previous one, but now we have to change the lower saturation bound separately from the upper saturation bound. So we will use four key presses (w, s, e, and d) rather than just the two we needed for adjustHue.
The adjustSat function takes in the image (in BGR format) and two tuples (the lower and upper bounds for inrange). It should loop until the user presses the space bar to go on. Each time through the loop it displays the current contour found, and lets the user alter the lower or upper saturation bound.
Here is the detailed pseudocode:
Algorithm adjustSat(image, lowerBounds, upperBounds)
1. Let lowSat be the saturation lower bound from lowerBounds
2. Let uppSat be the saturation upper bound from upperBounds
3. Loop until the user indicates to quit
4.     Call applyBounds and pass it image, lowerBounds, upperBounds, and a string "Adjusting sat"
5.     Save the results of the call in three variable, newIm, center, radius
6.     Display newIm with imshow
7.     Use waitKey to pause and to get a key value from the user
8.     If the user hit the space key, then break out of the loop
9.     If the user hit the 'w' key then:
10.         Add 5 to lowSat, but make sure it doesn't go over uppSat
11.         Create a new set of lower bounds, updating its low saturation value to lowSat
13.    If the user hit the 's' key then:
14.         Subtract 5 from lowSat, but make sure it doesn't go below 0
15.         Create a new set of lower bounds, updating its low saturation value to lowSat
16.    If the user hit the 'e' key then:
17.         Add 5 to uppSat, but make sure it doesn't go over 255
18.         Create a new set of upper bounds, updating its upper saturation value to uppSat
19.    If the user hit the 'd' key then:
20          Subtract 5 from uppSat, but make sure it doesn't go below lowSat
21.         Create a new set of upper bounds, updating its upper saturation value to uppSat
22. After the loop ends, return the final lower bounds and upper bounds, and the center point and radius of the circle
from applyBounds
Pseudocode for adjustVal
The adjustVal function will be almost identical to the adjustSat one, except that we look at the third entries in the bounds tuples, rather than the second ones. Because of that, I won’t include the pseudocode over again.
Testing your program
Once you have written one of these functions, be sure to test it. Be sure that you test multiple factors:
- Make sure that the limits on the updated values hold: that the hue values never go below 0 or above 180, that the
lowSatvalue can’t go below 0, or aboveuppSat, etc. - Make sure that the lower and upper bounds change correctly as you type the w, s, e, or d keys.
- Watch that changes to the bounds do (eventually) bring changes to the displayed contours and circles
- Examine the visual results carefully and experiment until you can isolate the ball in each of the pictures.
Below is a series of sample calls to this function, duplicated in the hw3Checker.py program. In Figure 4 you can see the kind of results you should be able to reach by adjusting hue, saturation, and value bounds.
pic1 = cv2.imread("SampleImage/BallFinding/Blue1BG1Mid.jpg")
pic2 = cv2.imread("SampleImage/BallFinding/Blue1BG3.jpg")
pic3 = cv2.imread("SampleImage/BallFinding/Green1BG1Mid.jpg")
pic4 = cv2.imread("SampleImage/BallFinding/Green1BG3.jpg")
pic5 = cv2.imread("SampleImage/BallFinding/OrangeBG1Near.jpg")
pic6 = cv2.imread("SampleImage/BallFinding/PinkBG1Mid.jpg")
pic7 = cv2.imread("SampleImage/BallFinding/YellowBG1Mid.jpg")

for pic in [pic1, pic2, pic3, pic4, pic5, pic6, pic7]:
    im, lb, ub, cnt, rad = hw3.findBall(pic)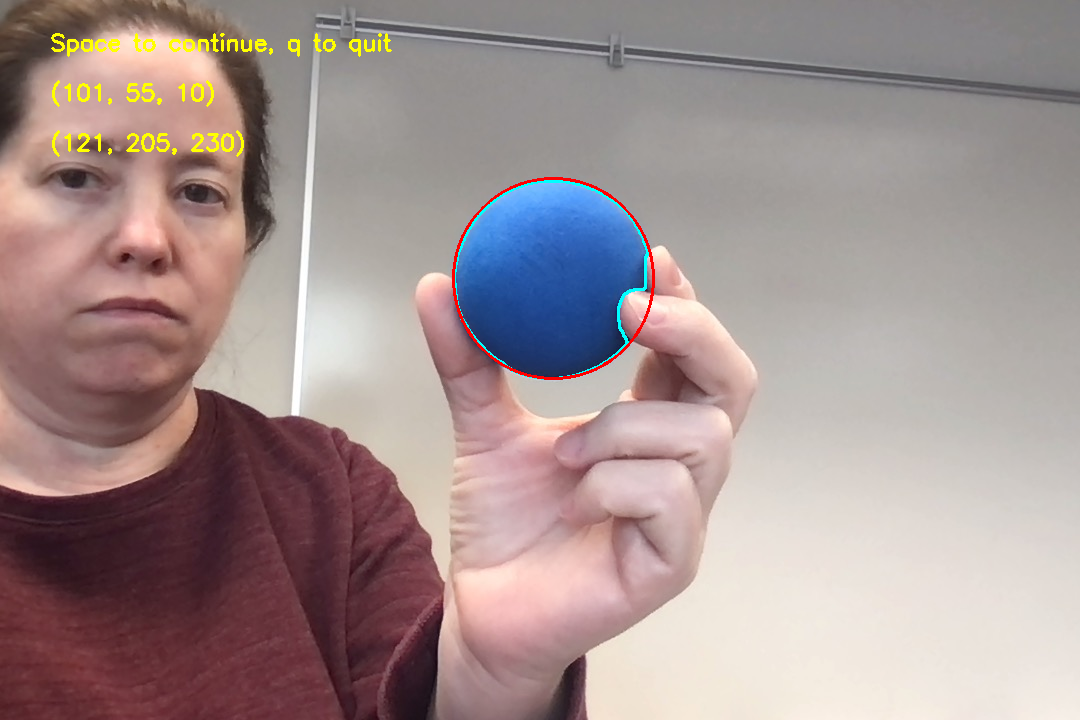
Blue1BG1Mid.jpg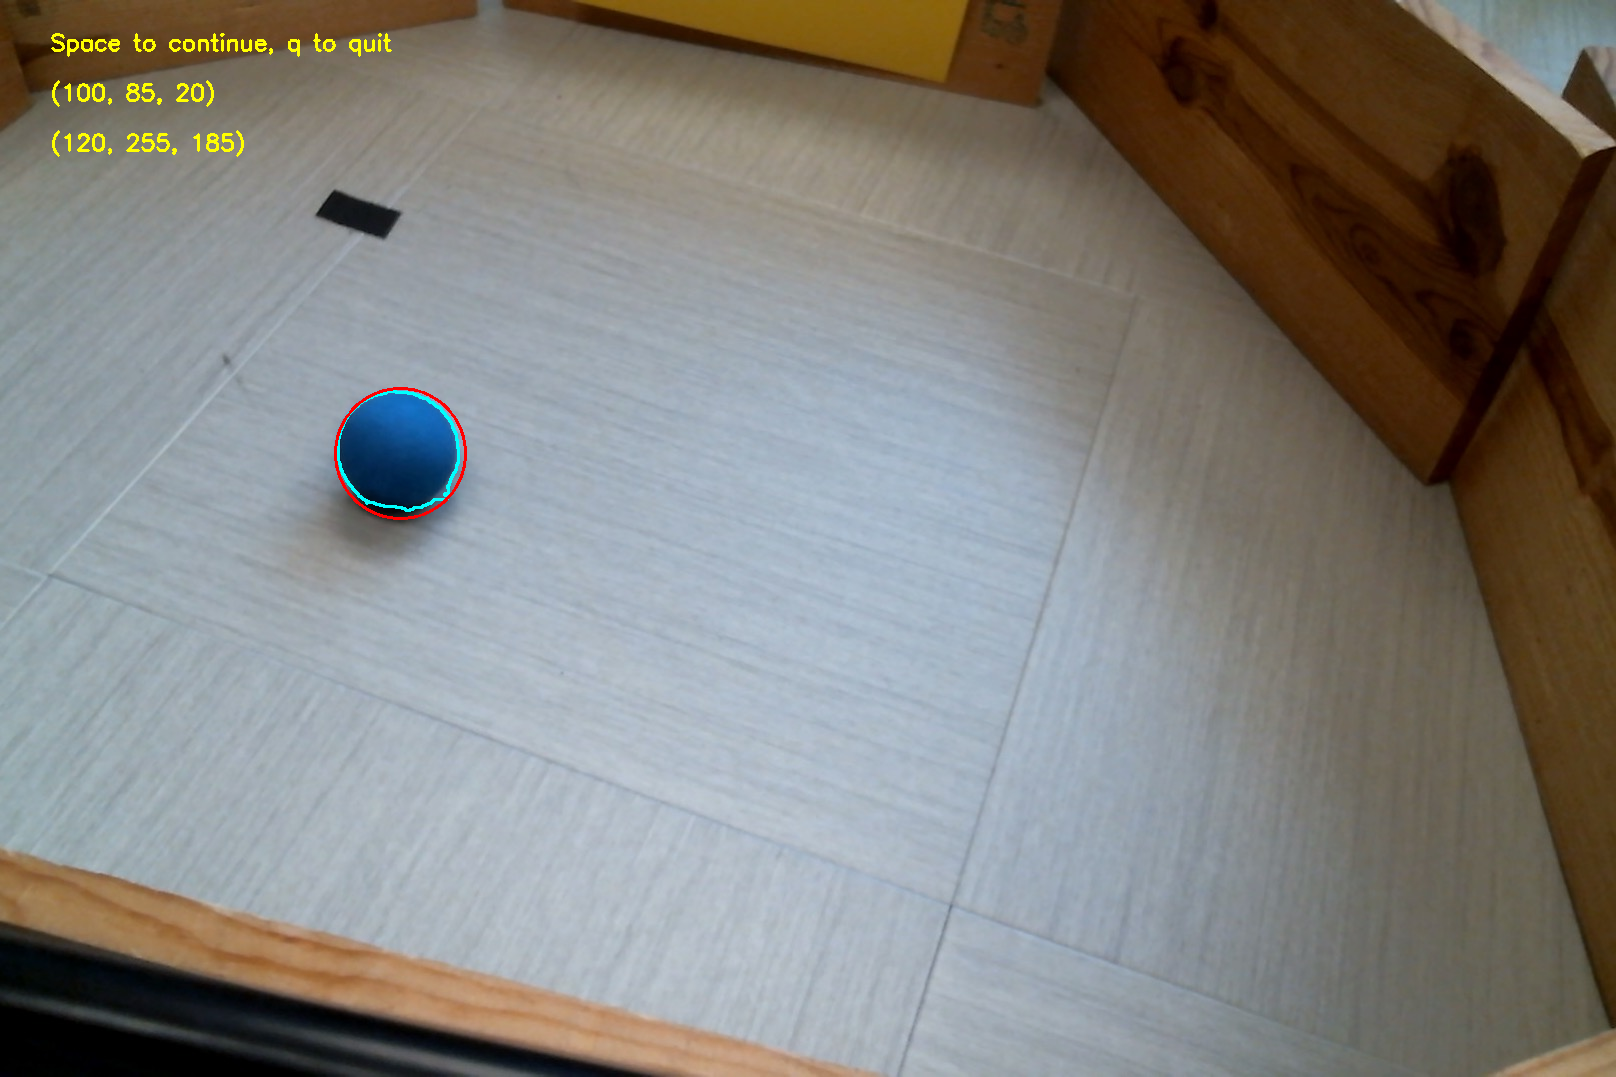
Blue1BG3.jpg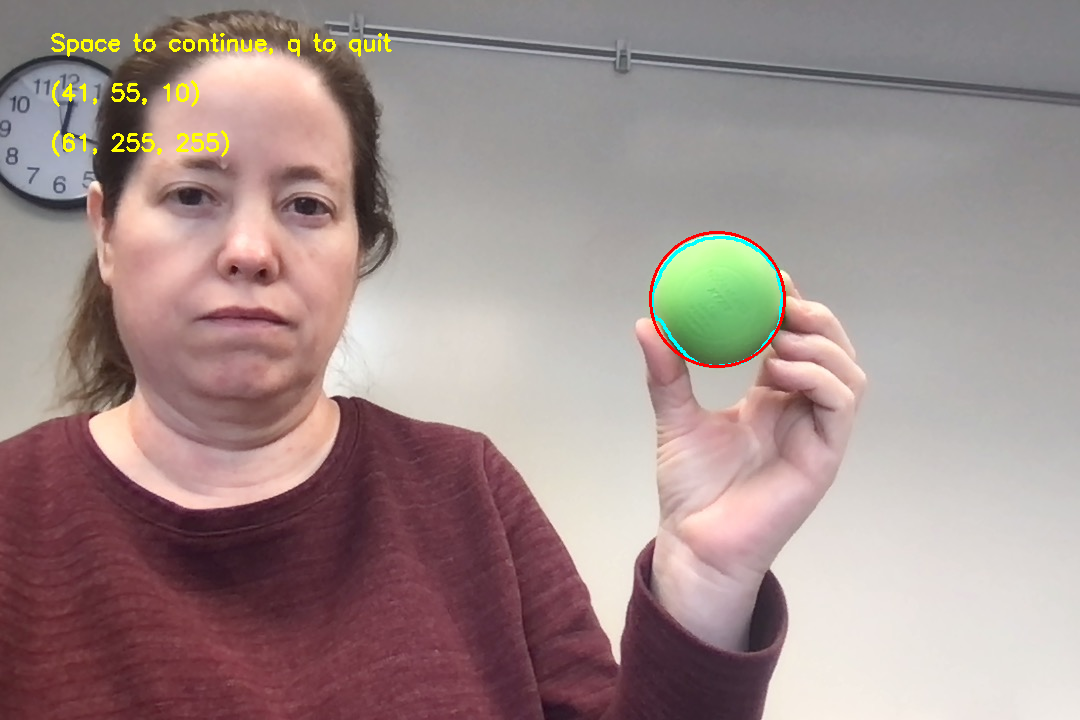
Green1BG1Mid.jpg
Green1BG3.jpg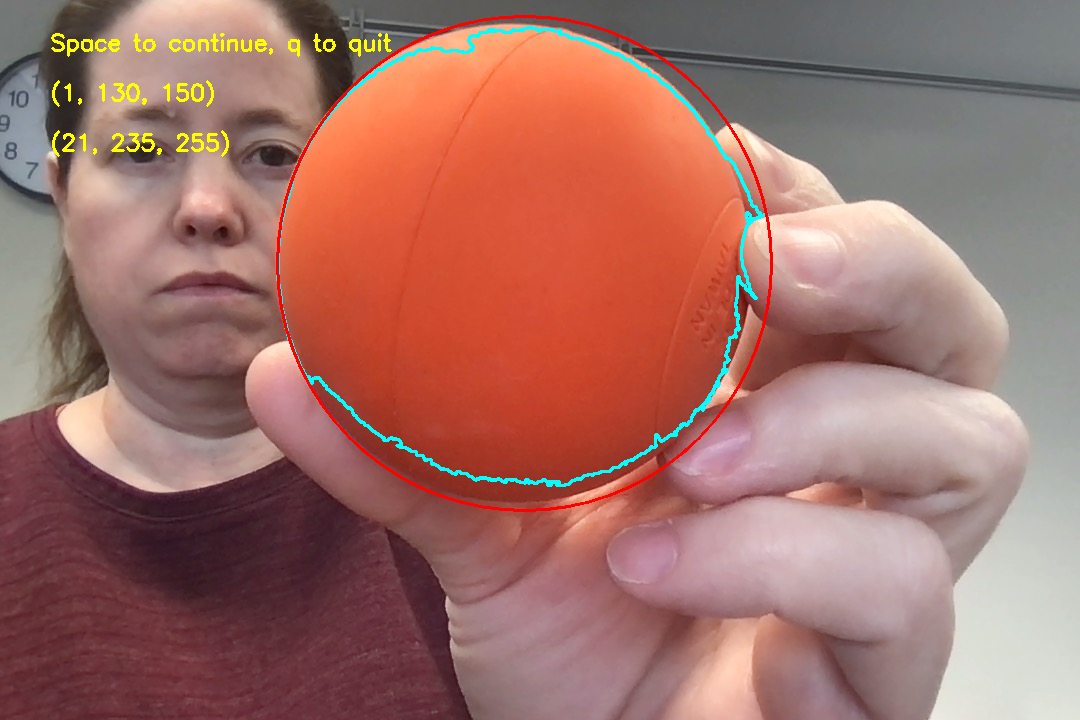
OrangeBG1Near.jpg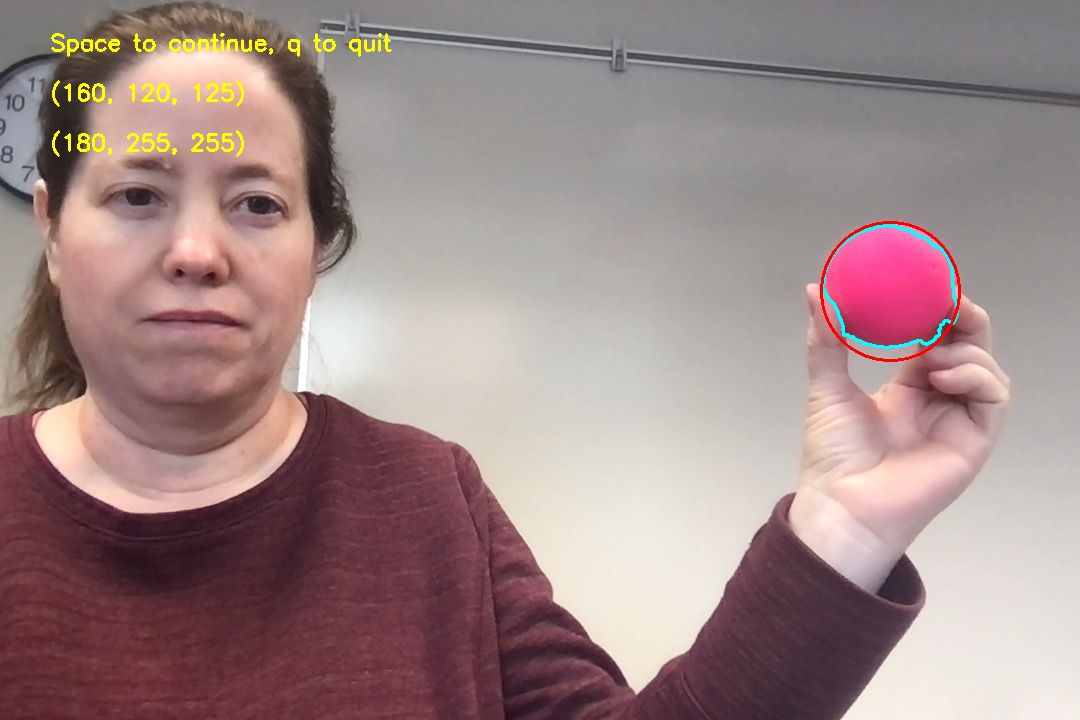
PinkBG1Mid.jpg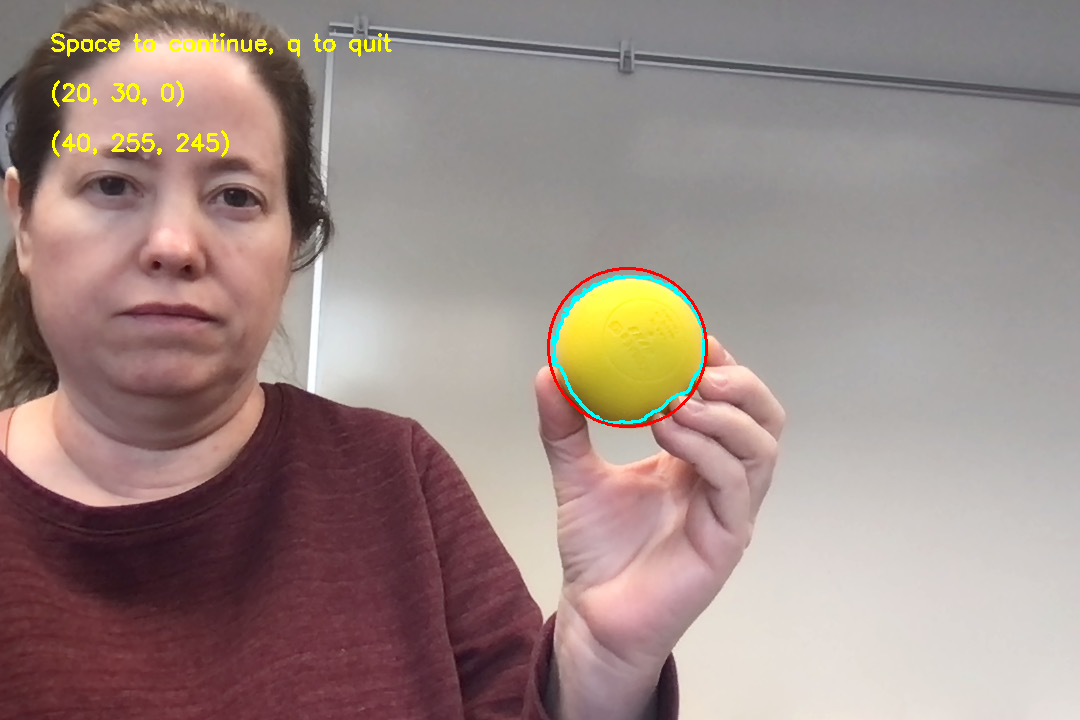
YellowBG1Mid.jpgSpecifications for Question 3
Base specifications:
- Defines all three functions with the correct headers: names and inputs for each
- The
adjustHuefunction:- Correctly computes the starting value for
currHueas described in the pseudocode - Uses a
whileloop correctly, quitting when the user presses the space key - Correctly calls
applyBoundsand displays the result - Updates
currHuecorrectly when the user presses the w or s key - Correctly limits
currHueto be between 10 and 170 - Returns the updated lower and upper bounds, and the position and size of the circle
- Correctly computes the starting value for
- The
adjustSatfunction:- Uses a
whileloop correctly, quitting when the user presses the space key - Correctly calls
applyBoundsand displays the result - Changes the lower saturation bound correctly in response to user pressing w or s
- Changes the upper saturation bound correctly in response to user pressing e or d
- Correctly limits the lower and upper saturation bounds so that the lower bound does not go below zero, or above the upper bound, and the upper bound does not go above 255 or below the lower bound
- Returns the updated lower and upper bounds, and the position and size of the circle
- Uses a
- The
adjustValfunction:- Uses a
whileloop correctly, quitting when the user presses the space key - Correctly calls
applyBoundsand displays the result - Changes the lower value bound correctly in response to user pressing w or s
- Changes the upper value bound correctly in response to user pressing e or d
- Correctly limits the lower and upper value bounds so that the lower bound does not go below zero, or above the upper bound, and the upper bound does not go above 255 or below the lower bound
- Returns the updated lower and upper bounds, and the position and size of the circle
- Uses a
Extended specifications:
- Code includes a triple-quoted docstring that describes the function’s input, purpose, and results
- Student name is at the top of the file
- Any completed TODO comments have been removed
- File format has appropriate style:
importstatements at the top- then function definitions with no script elements
- then the main script, all insidde the
if __name__ == '__main__':statement
Ratings:
- To receive a gold rating, complete at least 3 general specifications, plus at least 5 specifications for each function
- To receive a silver rating, complete at least 2 general specifications, plus at least 4 specifications for each function
- To receive a bronze rating, complete at least 2 general specifications, plus at least 3 specifications for each function
Question 4: Writing pseudocode
Suppose we want to use morphological filters on a video feed to make the video look a little bit glitchy. To do this, we will apply morphological filters to each frame of the video. We will keep a fixed neighborhood size of (9, 9), and a fixed neighborhood shape: an ellipse. However, every 5 to 15 frames, we will change the morphological filter we are going to use, choosing a new one at random from among: erosion, dilation, opening, blackhat, and gradient.
Write pseudocode that describes how to implement this task. Be detailed, but don’t write Python code (see the pseudocode I provided for the previous questions for the right level). Your algorithm should take in the source for the video (if you implemented this, it would be 0 for the webcam or a string if reading from a video file).
Here are some things to think about as you design a solution:
- The heart of this program is the typical video pattern (using
VideoCapture, reading, processing, and displaying frames) - To randomly select an operation, you could put the operation codes in a list and choose random elements from it
- To vary how long between changes, think about having a countdown timer variable that is set to a random starting value each time there is a change
Specifications for Question 4
Base specifications:
- Pseudocode is readable: what each line does is clearly stated
- Pseudocode correctly describes the overall process of working with and processing frames from a video
- Pseudocode correctly describes a method for randomly selecting a morphological operation
- Pseudocode correctly describe a method for randomly varying the time between changes from 5 to 15 frames
- Pseudocode displays the morphed image
Extended specifications:
- Student name is at the top of the file
- Any completed TODO comments have been removed
- File format has appropriate style:
importstatements at the top- then function definitions with no script elements
- then the main script, all inside the
if __name__ == '__main__':statement
Ratings:
- To receive a gold rating, fully complete 5 specifications, at least 4 base, and partially complete at least 1 more
- To receive a silver rating, fully complete at least 4 specifications, at least 3 base, and partially complete at least 1 more
- To receive a bronze rating, fully complete at least 3 specifications, at lesat 2 base, partially complete at least 1 more
Question 5: Augmenting an existing program
In the hw3Code.py file, you will find a version of the Camshift program. In this case, you pass it a reference picture, and it tries to find and track an object that matches the color in the reference picture.
Try out this program using any brightly-colored objects you have (you can borrow some of the colorful balls or other objects from my CV bag if you like.) I provided three reference images, to blue, green, or pink balls I have in my collection. But even if you use those, you might need to make your own reference images.
Look back at the readings or in-class activity for more details about how to make a reference image.
Your task: Your task is to extend this program so that it can track two differently-colored objects at the same time. You will need to do the following:
- Change the function header so that it takes in two reference pictures
- Set up two separate histograms, one for each reference picture
- Set up two separate track windows
- Process the frame twice, once for each histogram/track window
- Draw ellipses for both objects on the frame before displaying it (be sure to draw them in two different colors)
A challenge for you: Suppose you wanted to track two objects of the same color. Try that once you get your solution working: what happens? Can you figure out a way to solve the problem?
Specifications for Question 5
Base specifications:
- Function takes two inputs, both reference images, with meaningful variable names
- Function correctly sets up two histograms
- Function correctly sets up two track windows and updates each of them at the same points in the same way
- Function processes the original frame twice: once for each histogram/track window pairing
- Function records both new track boxes and both new track windows, and draws ellipses correctly to show the track boxes
- Overall processing of video is handled correctly
Extended specifications:
- Docstring is updated to reflect the function’s new operations
- Student name is at the top of the file
- Any completed TODO comments have been removed
- File format has appropriate style:
importstatements at the top- then function definitions with no script elements
- then the main script, all insidde the
if __name__ == '__main__':statement
Ratings:
- To receive a gold rating, complete at least 8 specifications in all, at least 5 of them base specifications.
- To receive a silver rating, complete at least 7 specifications in all, at least 4 of them base.
- To receive a bronze rating, complete at least 5 total specifications, at least 2 of them base.
Question 6: Writing a program of your own design
For this question, I’m asking you to unleash your creativity, and use the image processing and image transformation tools we have learned to modify a video feed to display your chosen “vibe”.
- Add spooky effects
- Add happy, bouncy, Kpop effects
- Add gentle, relaxing effects
It’s your choice (keep it all family-friendly).
Here are the techniques you could apply here:
- Brightening/darkening with image arithmetic
- Cropping or resizing other images to substitute randomly or periodically for the video feed
- Flashing other images, almost like subliminal messages
- Or blending a beautiful image with the camera feed for a soothing effect
- Using masks or threshold images in themselves or to let you add or substitute parts of other images over the video feed
- You could add small pictures to the video feed background
- You could change every pixel matching a certain color range to another color
- Using geometric transformations to make the camera view move, rotate, skew, etc.
- Using image filters to alter the look of the video feed (blurring, morphing, edge detection)
- Using motion detection to get a weird effect, or to highlight places in an image where motion is happening
- You could brighten/darkent parts that have movement, or tint them
Choose at least four different kinds of transformations from the list below and apply them across the frames of the video. You can apply them to all of a frame, or just to part of the frame. Ideally the transformation will not be statc: it should change in amount or intensity over time, or only be applied periodically, etc. Here is the list:
- Brighten/darken part or all of an image
- Tint part or all of an image
- Blend part or all of an image
- Substitute another image for part or all of an image
- Apply a mask to part or all of an image
- Apply grayscale or color thresholding to part or all of an image
- Apply translation to part or all of an image
- Apply rotation to part or all of an image
- Apply general affine warping (or perspective warping) to part or all of an image
- Apply blurring to part or all of an image
- Apply one or more morphological filters to part or all of an image
- Apply edge detection (Sobel or Canny) to part or all of an image
- Apply simple motion detection to part or all of an image
Incorporate your effects into a function called videoVibe that applies your transformations to a video feed. Like earlier examples, videoVibe should have one parameter input, either a webcam number or a string path to a stored video file (unmodified).
Feel free to use helper functions where it makes sense.
Use good style, and comment your code!
In the code file, include a triple-quoted string above your videoVibe function where you write a paragraph or two about what vibe you were going for, and how you feel the transformations you did contribute to that vibe.
A note about testing: The check_videoVibe function in hw3Checker.py uses several stored videos from our SampleVideos folder. These videos are too large to be stored in Github. Just copy them to the SampleImages folder before testing with them.
Specifications for Question 6
Base specifications:
- Solution defines a function called
videoVibewith the right input parameter - This function and any helpers all have clear descriptive docstring comments, and include hash-mark comments at key points within their definitions
- This program incorporates at least four transformations from the list above
- The transformations are not static, but change over time
- The program is effective in generating the effect, or vibe, the programmer says they were looking for
Extended specifications:
- Some transformations include randomness to make the effects less predictable
- Student name is at the top of the file
- Any completed TODO comments have been removed
- File format has appropriate style:
importstatements at the top- then function definitions with no script elements
- then the main script, all inside the
if __name__ == '__main__':statement
Ratings:
- To receive a gold rating, complete at least 6 specifications in all, at least 5 of them base.
- To receive a silver rating, complete at least 5 specifications in all, at least 4 of them base.
- To receive a bronze rating, complete at least 4 total specifications, at least 3 of them base.
What to hand in
You will hand in your work using commit and push to copy the files to Github (you should commit and push after every work session, not just at the end).
You should make sure these files are added by git to the files it is tracking:
hw3Code.py(all your work goes here)hw3Checker.py- The selected images/videos in the
SampleImagesfolder - Any other images you used