Overview
This assignment is individual work!
- Do not share or borrow solutions from other students.
- Do not use AI assistants to generate code for you.
- Do ask preceptors and instructors for help with the code, including what to write and debugging.
- Do ask peers or AI assistants for help in understanding error messages, but not for help in writing or debugging your work.
This homework assignment will ask you to demonstrate your skills at understanding, debugging, planning, and creating python scripts and function. The list of topics for this assignment include:
- Continued work with lists, strings, and numbers, for loops and conditionals
- Functions
- Numpy arrays
- Image “arithmetic”
- Regions of interest
To hand in: You will use the Homework 2 Github Assignment to set up this assignment, and to push your code to save it to the cloud, to hand it in. Note that all your work will go into a single file for this assignment. A starter file, hw2Code.py will be provided, add your work there, and test your work with the hw2Checker.py file.
Handling images: I will provide in the Github assignment just those images you need to have to do this assignment.
Question 1: Implementing a simple function
Create a function called divisBy that has two input parameters, both numbers, a and b. Your function should determine if a is divisible by b evenly, and it should return True if it is, and False if it is not. (Hint: use the remainder operator (%) to help you: if a is divisible by b then the remainder of a and b is zero.)
Below are a few sample calls to show how to call divisBy. There are more sample calls in hw2Code.py and even more in hw2Checker.py.
Specifications for Question 1
Base specifications:
- Solution defines a function called
divisBy - Function header correctly specifies the name and inputs for this function
- Function always returns a Boolean value (either
TrueorFalse) for any numeric input - Function returns the correct answer for any valid inputs
- Code includes a triple-quoted docstring that describes the function’s input, purpose, and results
Extended specifications:
- Student name is at the top of the file
- Any completed TODO comments have been removed
- File format has appropriate style:
importstatements at the top- then function definitions with no script elements
- then the main script, all insidde the
if __name__ == '__main__':statement
Ratings:
- To receive a gold rating, complete at least 6 specifications, at least 4 of them base
- To receive a silver rating, complete at least 5 specifications, at least 3 of them base
- To receive a bronze rating, complete at least 4 specifications, at least 2 of them base
Question 2: Designing pseudocode
We often use pseudocode as the first step when we need to solve a programming problem. Writing our ideas in pseudocode lets us work out ideas without having to write proper Python (or any other language) at the same time.
Below is the specification of a complicated task. Without worrying about how to do each step in python, write out an algorithm in pseudocode that can solve this problem.
The problem: Suppose we have a long list of data that represents hourly temperature data from a particular temperature sensor. We might have weeks worth of data, one reading per hour. We want to find the temperature peaks, readings that are greater than or equal to both previous and following readings. For example, suppose the list below is a portion of our data. We would want to report the peaks at position 3, 8, and 15.
temps = [43, 45, 46, 48, 46, 45, 46, 47, 50, 49, 48, 48, 49, 50, 52, 55, 51, 48]
print(findPeaks(temps))
[3, 8, 15]There are some special situations to consider here:
- The first and last positions in the list have only one neighboring reading. We will consider the first position (position 0) to be a peak if its value is greater than or equal to the value at position 1, and similarly the last position in the list is a peak if its value is greater than or equal to the value to its left. See this example:
- Temperatures could plateau: we will consider all positions where previous and following are equal to the current temperature as peaks:
specTemps2 = [-3, 0, 1, 2, 2, 2, 2, 3, 4, 4, 4, 3, 2, 1, 0, -1, -5, -8, -15]
print(findPeaks(specTemps2))
[3, 4, 5, 8, 9, 10]Design an algorithm for findPeaks, writing it in pseudocode, not in Python. Here are a few hints:
- You will need a loop over positions in the list, think about only looping over indices that have two neighbors
- Handle the first position as a special case before the loop, and the last position as a special case after the loop
- You will need an accumulator variable to hold the answer list, the list of indices
Specifications for Question 2
Base specifications:
- Pseudocode is readable: what each line does is clearly stated
- Pseudocode includes an accumulator for the answer list
- Pseudocode includes a loop over (some of) the indices in the list
- Pseudocode adds all the correct values it should to the answer list accumulator
- Pseudocode loops correctly over the indices
- Pseudocode handles start and end position special cases correctly
Extended specifications:
- Student name is at the top of the file
- Any completed TODO comments have been removed
- File format has appropriate style:
importstatements at the top- then function definitions with no script elements
- then the main script, all inside the
if __name__ == '__main__':statement
Ratings:
- To receive a gold rating, fully complete 6 specifications, at least 4 base, partially complete at least 2 more
- To receive a silver rating, fully complete at least 6 specifications, at least 3 base, partially complete at least 1 more
- To receive a bronze rating, fully complete at least 5 specifications, at lesat 2 base, partially complete at least 1 more
Question 3: Completing a multi-function program
Most programs involve writing multiple functions that work together to solve a problem. Typically, a function should have a single purpose, and if a part of its purpose is complex enough, then we might break it into a separate function to make it easier to code, debug, and maintain.
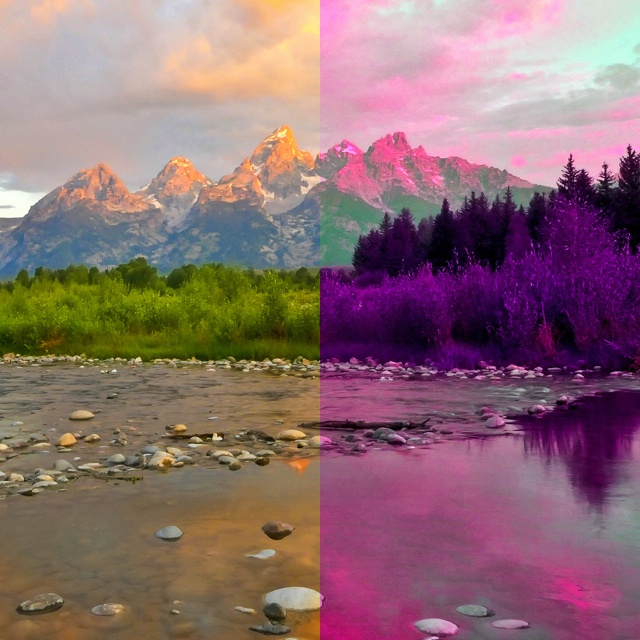
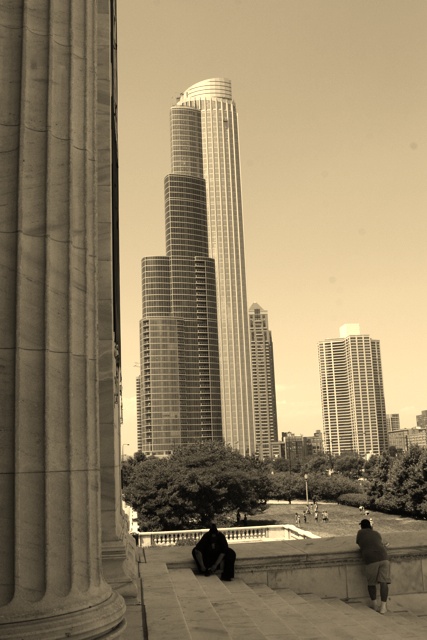
Under Question 3 in the hw2Code.py file, there is a partially-completed program made up of two functions. The main function, cropAndBlend is defined. Its purpose is to read in two images, randomly crop two portions of the images that are the same size, and then blend them together. It returns the resulting image.
Below is a sample call to this function, and, in Figure 1, several different outputs for that call (because of the random crop, the image generated may differ).

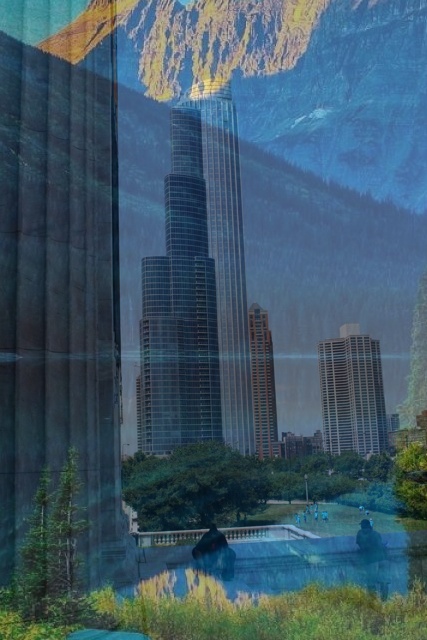

landscape.jpg with chicago.jpg, three runs
Your job: write randomCrop
Your task is to add the helper function, randomCrop, to this program. The randomCrop function has a much easier task. It takes in three input arguments: an image to crop, and the width and height that the resulting image should have. It should choose a valid region of interest (ROI) of the given size, and then it should return the ROI image.
Below is a code sample showing how we might call randomCrop separately to test it, and in Figure 2 are four random results from this call.


landscape1.jpg image, returning 250 by 250 pixel images.
Here is an algorithm for what randomCrop needs to do, written in high-level pseudocode:
Algorithm randomCrop(image, wid, hgt)
1. Get the dimensions of the image, particularly imWid and imHgt, its width and height
2. Calculate the maximum x value that will ensure the crop width won't go beyond imWid
3. Calculate the maximum y value that will ensure the crop height won't go beyond imHgt
4. Generate a random integer between 0 and the max x value
5. Generate a random integer between 0 and the max y value
6. Let cropped = a slicing of image starting with random x and random y, with wid and hgt from inputs
7. Return cropped- 1
- This is the tricky part!
- 2
- These will be the left and upper edge of the ROI, the starting x and y values
Steps 2 and 3 in the algorithm take a little bit of thought. We want to make sure that the crop is (1) the right size, and (2) fits entirely within the original image. How can we do that?
- If we pick a good index
x1for the left edge of the crop region, then the right edge will just bex1 + wid - Similarly, if we pick a good index
y1for the top edge of the crop region, then the bottom edge will bey1 + hgt - What range of values are “good” indices? That depends on the relative sizes of the image and the input
widorhgt- You may assume that
widwill be less than the width of the original image - You may assume that
hgtwill be less than the height of the original image - Given that, 0 is the smallest “good” index for both width and height
- To determine the formula for the max x value and max y value, run the
runCropPositions.pyprogram and watch the animation it draws. It shows an example image and crop size, and demonstrates the range of good x indices for that example. (Ask for help if you can’t figure out how to calculate the max)
- You may assume that
Complete the randomCrop function, and test it both with the sample calls in the hw2Code.py file (and others that you add), and also with the hw2Checker.py file, which contains two testing functions for this problem.
Specifications for Question 3
Base specifications:
- Solution defines a function called
randomCrop - Function header correctly specifies the name and inputs for this function
- Function correctly computes the range of valid indices for the left edge of the crop, based on the width of the image and the input width
- Function correctly computes the range of valid indices for the upper edge of the crop, based on the height of the image and the input height
- Function correctly generates random left and upper indices for the crop
- Function crops the image correctly by defining an ROI of the right size
- Function returns the cropped image
- Code includes a triple-quoted docstring that describes the function’s input, purpose, and results
Extended specifications:
- Student name is at the top of the file
- Any completed TODO comments have been removed
- File format has appropriate style:
importstatements at the top- then function definitions with no script elements
- then the main script, all insidde the
if __name__ == '__main__':statement
Ratings:
- To receive a gold rating, complete 8 specifications in all, at least 6 of them base specifications.
- To receive a silver rating, complete at least 7 specifications in all, at least 5 of them base specifications.
- To receive a bronze rating, complete at least 6 specifications in all, at least 4 of them base specification.
Question 4: Extending an existing function
For this question you will take an incomplete function and will add to it. Specifically, you will convert a function called findMinMax, which finds the smallest and largest values in a list of numbers, to be a function findMedian that finds the median of the list.
The median of a list of numbers is defined to be the middle value, if the length of the list is odd. If the length is even, then we find the two numbers closest to the middle, and average them. Below are some examples showing lists of numbers and the median value, as calculated by the findMedian function.
nums1 = [5, 7, 1, 3, 8]
med1 = findMedian(nums1)
print("Median 1 =", med1)
nums2 = [10, 20, 30, 40]
med2 = findMedian(nums2)
print("Median 2 =", med2)
Median 1 = 5
Median 2 = 25.0Step 1: Examine findMinMax
Look at the definition of findMinMax in hw2Code.py. It first sorts the list, and then access the first and last values.
We are going to keep the first two lines of the function: the one that defines n to be the length of the list, and the one that sorts the list.
Instead of the first and last elements, however, we need to find the middle element(s).
Step 2: Set up findMedian
Copy the function definition for findMinMax, and change its name to findMedian. Remove the final line (the one that returned the first and last).
Step 3: Split into two cases: even versus odd length
Add an if statement to the function definition, right after the line that sorts the list. In the if statement, one case should be for odd-length lists, and the other for even-length lists.
(To use incremental development, add a print statement to each case as a placeholder, and print a message identifying which case it is. Then see if it prints the right message for sample lists.)
Step 4: Find the middle element of an odd-length list
Start with the easier case: we need to figure out which position in the list is the middle one. Start by looking at Figure 3 for some examples of different odd-length lists, and which position is the middle one.
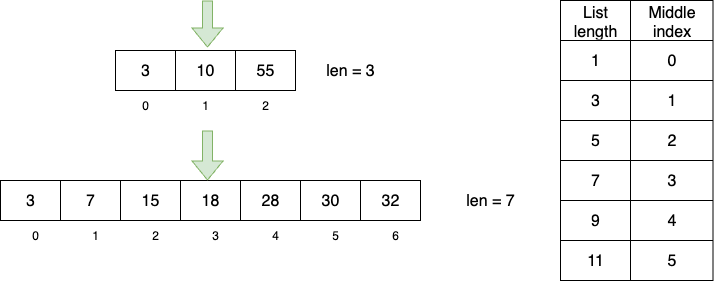
To get the middle value, we need to divide by two, and then round down (multiple ways of doing this, including: subtract one then divide by 2, do integer division by 2, divide by 2 and then use math.floor: pick one!)
In the correct part of the if stastement, write code that accesses the value at the middle position, and then returns it.
Step 5: Find the middle elements of an even-length list
When the list is even in length, we need to find the middle two positions, so that we can average them. Figure 4 shows some examples to help you figure this out.
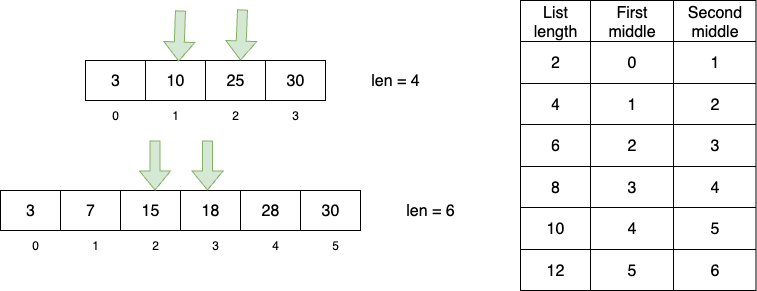
Notice the relationship between the list length and the second of the two middle indices. That’s easy to compute, and the first index is just one to the left of the second.
In the correct part of the if statement, write code that accesses both middle values. Compute the average of the two (add them up, divide by 2) and return it.
Test the program on sample calls in the hw2code.py file (add more of your own). And also test it using the hw2Checker.py file.
Specifications for Question 4
Base specifications:
- Solution defines a function called
findMedian - Function header correctly specifies the name and inputs for this function
- Function keeps the first two lines from
findMinMax - Function correctly distinguishes even-length lists from odd-length lists, with an
ifstatement - Function correctly finds and returns the middle value from an odd-length list
- Function correctly finds and returns the average of the two middle values from an even-length list
- Code includes a triple-quoted docstring that describes the function’s input, purpose, and results
Extended specifications:
- Student name is at the top of the file
- Any completed TODO comments have been removed
- File format has appropriate style:
importstatements at the top- then function definitions with no script elements
- then the main script, all insidde the
if __name__ == '__main__':statement
Ratings:
- To receive a gold rating, complete at least 8 specifications in all, at least 6 of them base specifications.
- To receive a silver rating, complete at least 7 specifications in all, at least 5 of them base.
- To receive a bronze rating, complete at least 6 total specifications, at least 4 of them base.
Question 5: Debugging a program
In the hw2Code.py file is a program called colorBlink. It is made up of the colorBlink function, plus the halfColorShuffle function and the colorShuffle function (from an ICA). This program is supposed to take in an image as its input argument. It should change just the right half of the image to have randomly shuffled color channels. It displays the shuffle for half a second, and then repeats the process until the user types the 'q' key to quit.
Here is a sample call to colorBlink like the one in the main script:
In Figure 5 below, you can see some of the images that would result from this call.
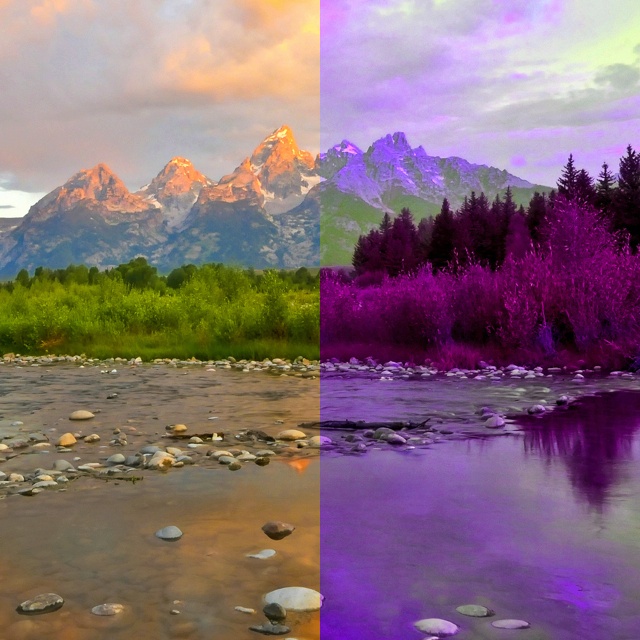


colorBlink program, with the right half color-shuffled.
This program is buggy! This program doesn’t work, and your job is to find the bugs and fix them. There are three functions in this program: each function will contain 2 bugs… there are 6 bugs in all!
Find each bug, fix it, and add a comment on the line that describes the bug and its fix.
Specifications for Question 5
Base specifications:
- Find, correct, and label first bug in
colorBlinkfunction - Find, correct, and label second bug in
colorBlinkfunction - Find, correct, and label first bug in
halfColorShufflefunction - Find, correct, and label second bug in
halfColorShufflefunction - Find, correct, and label first bug in
colorShufflefunction - Find, correct, and label second bug in
colorShufflefunction
Extended specifications:
- Student name is at the top of the file
- Any completed TODO comments have been removed
- File format has appropriate style:
importstatements at the top- then function definitions with no script elements
- then the main script, all insidde the
if __name__ == '__main__':statement
Ratings:
- To receive a gold rating, complete at least 8 specifications in all, at least 5 of them base specifications.
- To receive a silver rating, complete at least 7 specifications in all, at least 4 of them base.
- To receive a bronze rating, complete at least 5 total specifications, at least 2 of them base.
Question 6: Convert pseudocode to function
For this problem, I will provide detailed pseudocode, and your task is to convert that into working Python code.
This algorithm converts a color image into sepia-tone, which is a variation on grayscale that tends toward a brown-golden range of colors, rather than true grays. Sepia was a photographic technique from the 19th century, and early “black and white” films. It used a pigment from cuttlefish skin to stabilize and preserve photographs, and it tinted the images warm shades of brown, because of the brown color of the cuttlefish skin. A great example of sepia-tone in movies are the Kansas sequences in The Wizard of Oz (the start and end of the film).
The algorithm you implement converts a color image represented as a numpy array into a new array that represents a (simulated) sepia image. It will use array/image arithmetic to simplify the task.
Below are a set of sample calls to the sepia function, and Figure 6 contains the correct output for those calls.

sepia function
The sepia image has new values in its red, green, and blue channels, defined according to these formulas:
\[ red_{new} = 0.393 \cdot red_{old} + 0.769 \cdot green_{old} + 0.189 \cdot blue_{old} \]
\[ green_{new} = 0.349 \cdot red_{old} + 0.686 \cdot green_{old} + 0.168 \cdot blue_{old} \]
\[ blue_{new} = 0.272 \cdot red_{old} + 0.534 \cdot green_{old} + 0.131 \cdot blue_{old} \]
Below is the pseudocode for this algorithm:
Algorithm sepia(image)
---- Takes in a color image and makes a new image that is a sepia version of the input one
1. Separate the three color channels from the image into separate variables
2. Compute a new red channel array using the formula given above
3. Compute a new green channel array using the formula given above
4. Compute a new blue channel array using the formula given above
5. For the new red channel, set any values over 255 to be 255 and convert to uint8
6. For the new green channel, set any values over 255 to be 255 and convert to uint8
7. For the new blue channel, set any values over 255 to be 255 and convert to uint8
8. Combine the new channels to form a new color image
9. Return that image
Hints:
- You will want to use
cv2.splitandcv2.mergein this function, to separate the color channels and then to combine them back together later. - We can apply the formulas above to whole channel arrays at a time
- To cap the values at 255, use the Numpy function
np.clip - To convert to
np.uint8, try the Numpyastypemethod
Test your program on the sample calls in hw2Code.py and also use the code in hw2Checker.py.
Specifications for Question 6
Base specifications:
- Solution defines a function called
sepia - Function header correctly specifies the name and inputs for this function
- Function correctly separates the channels of the color image into three separate variables
- Function correctly implements the first formula to calculate red values on the whole red channel at once
- Function correctly implements the second formula to calculate green values on the whole green channel at once
- Function correctly implements the third formula to calculate blue values on the whole blue channel at once
- Function correctly clips each channel and converts it back to
np.uint8 - Function returns the final image
- Code includes a triple-quoted docstring that describes the function’s input, purpose, and results
Extended specifications:
- Student name is at the top of the file
- Any completed TODO comments have been removed
- File format has appropriate style:
importstatements at the top- then function definitions with no script elements
- then the main script, all inside the
if __name__ == '__main__':statement
Ratings:
- To receive a gold rating, complete at least 9 specifications in all, at least 7 of them base.
- To receive a silver rating, complete at least 8 specifications in all, at least 6 of them base.
- To receive a bronze rating, complete at least 7 total specifications, at least 5 of them base.
What to hand in
You will hand in your work using commit and push to copy the files to Github (you should commit and push after every work session, not just at the end).
You should make sure these files are added by git to the files it is tracking:
hw2Code.py(all your work goes here)hw2Checker.pyshowCropPositions.py- The selected images in the
SampleImagesfolder - Any other images you used